So, there are so many parts to my midterm project that just trying to explain it can be confusing. Let me begin to try explaining it to you by walking you through it in stages–then we can get into the gory details.
A Walk-Through
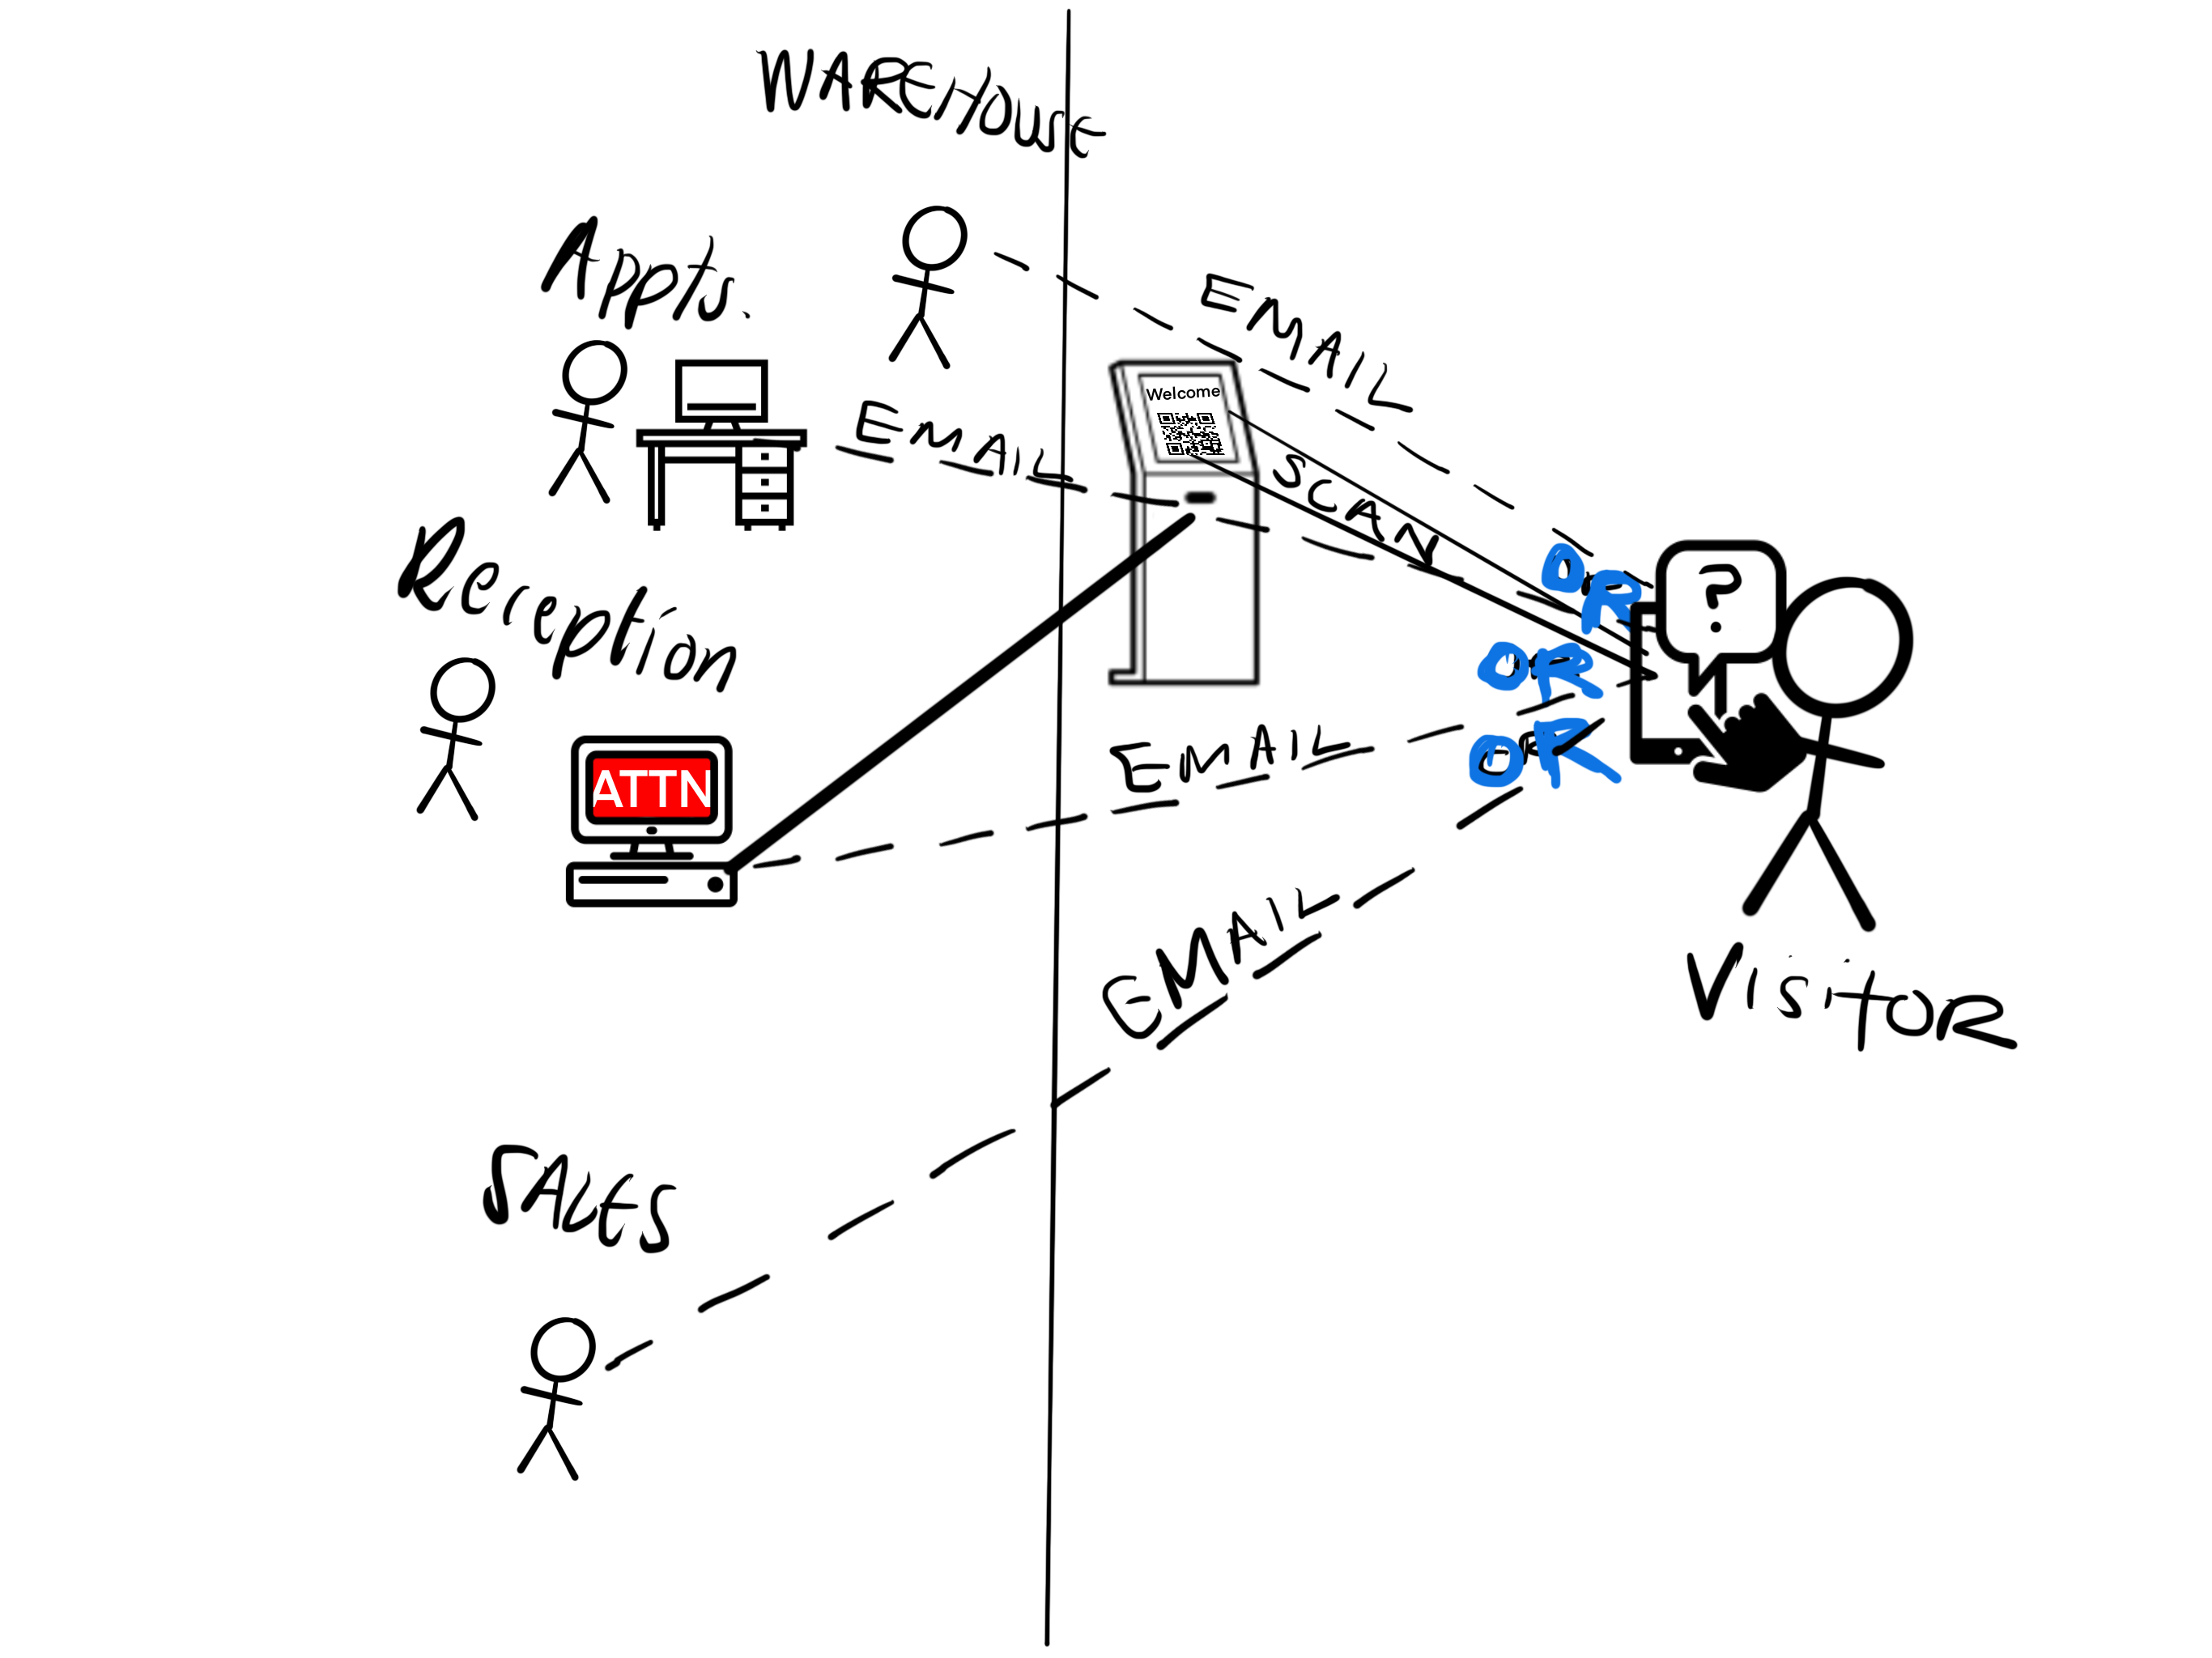
First of all, the concept: A device that acts as a welcome kiosk for visitors to small businesses/offices that aren’t always able to keep an eye on the front door or who might commonly find themselves with several visitors at once.
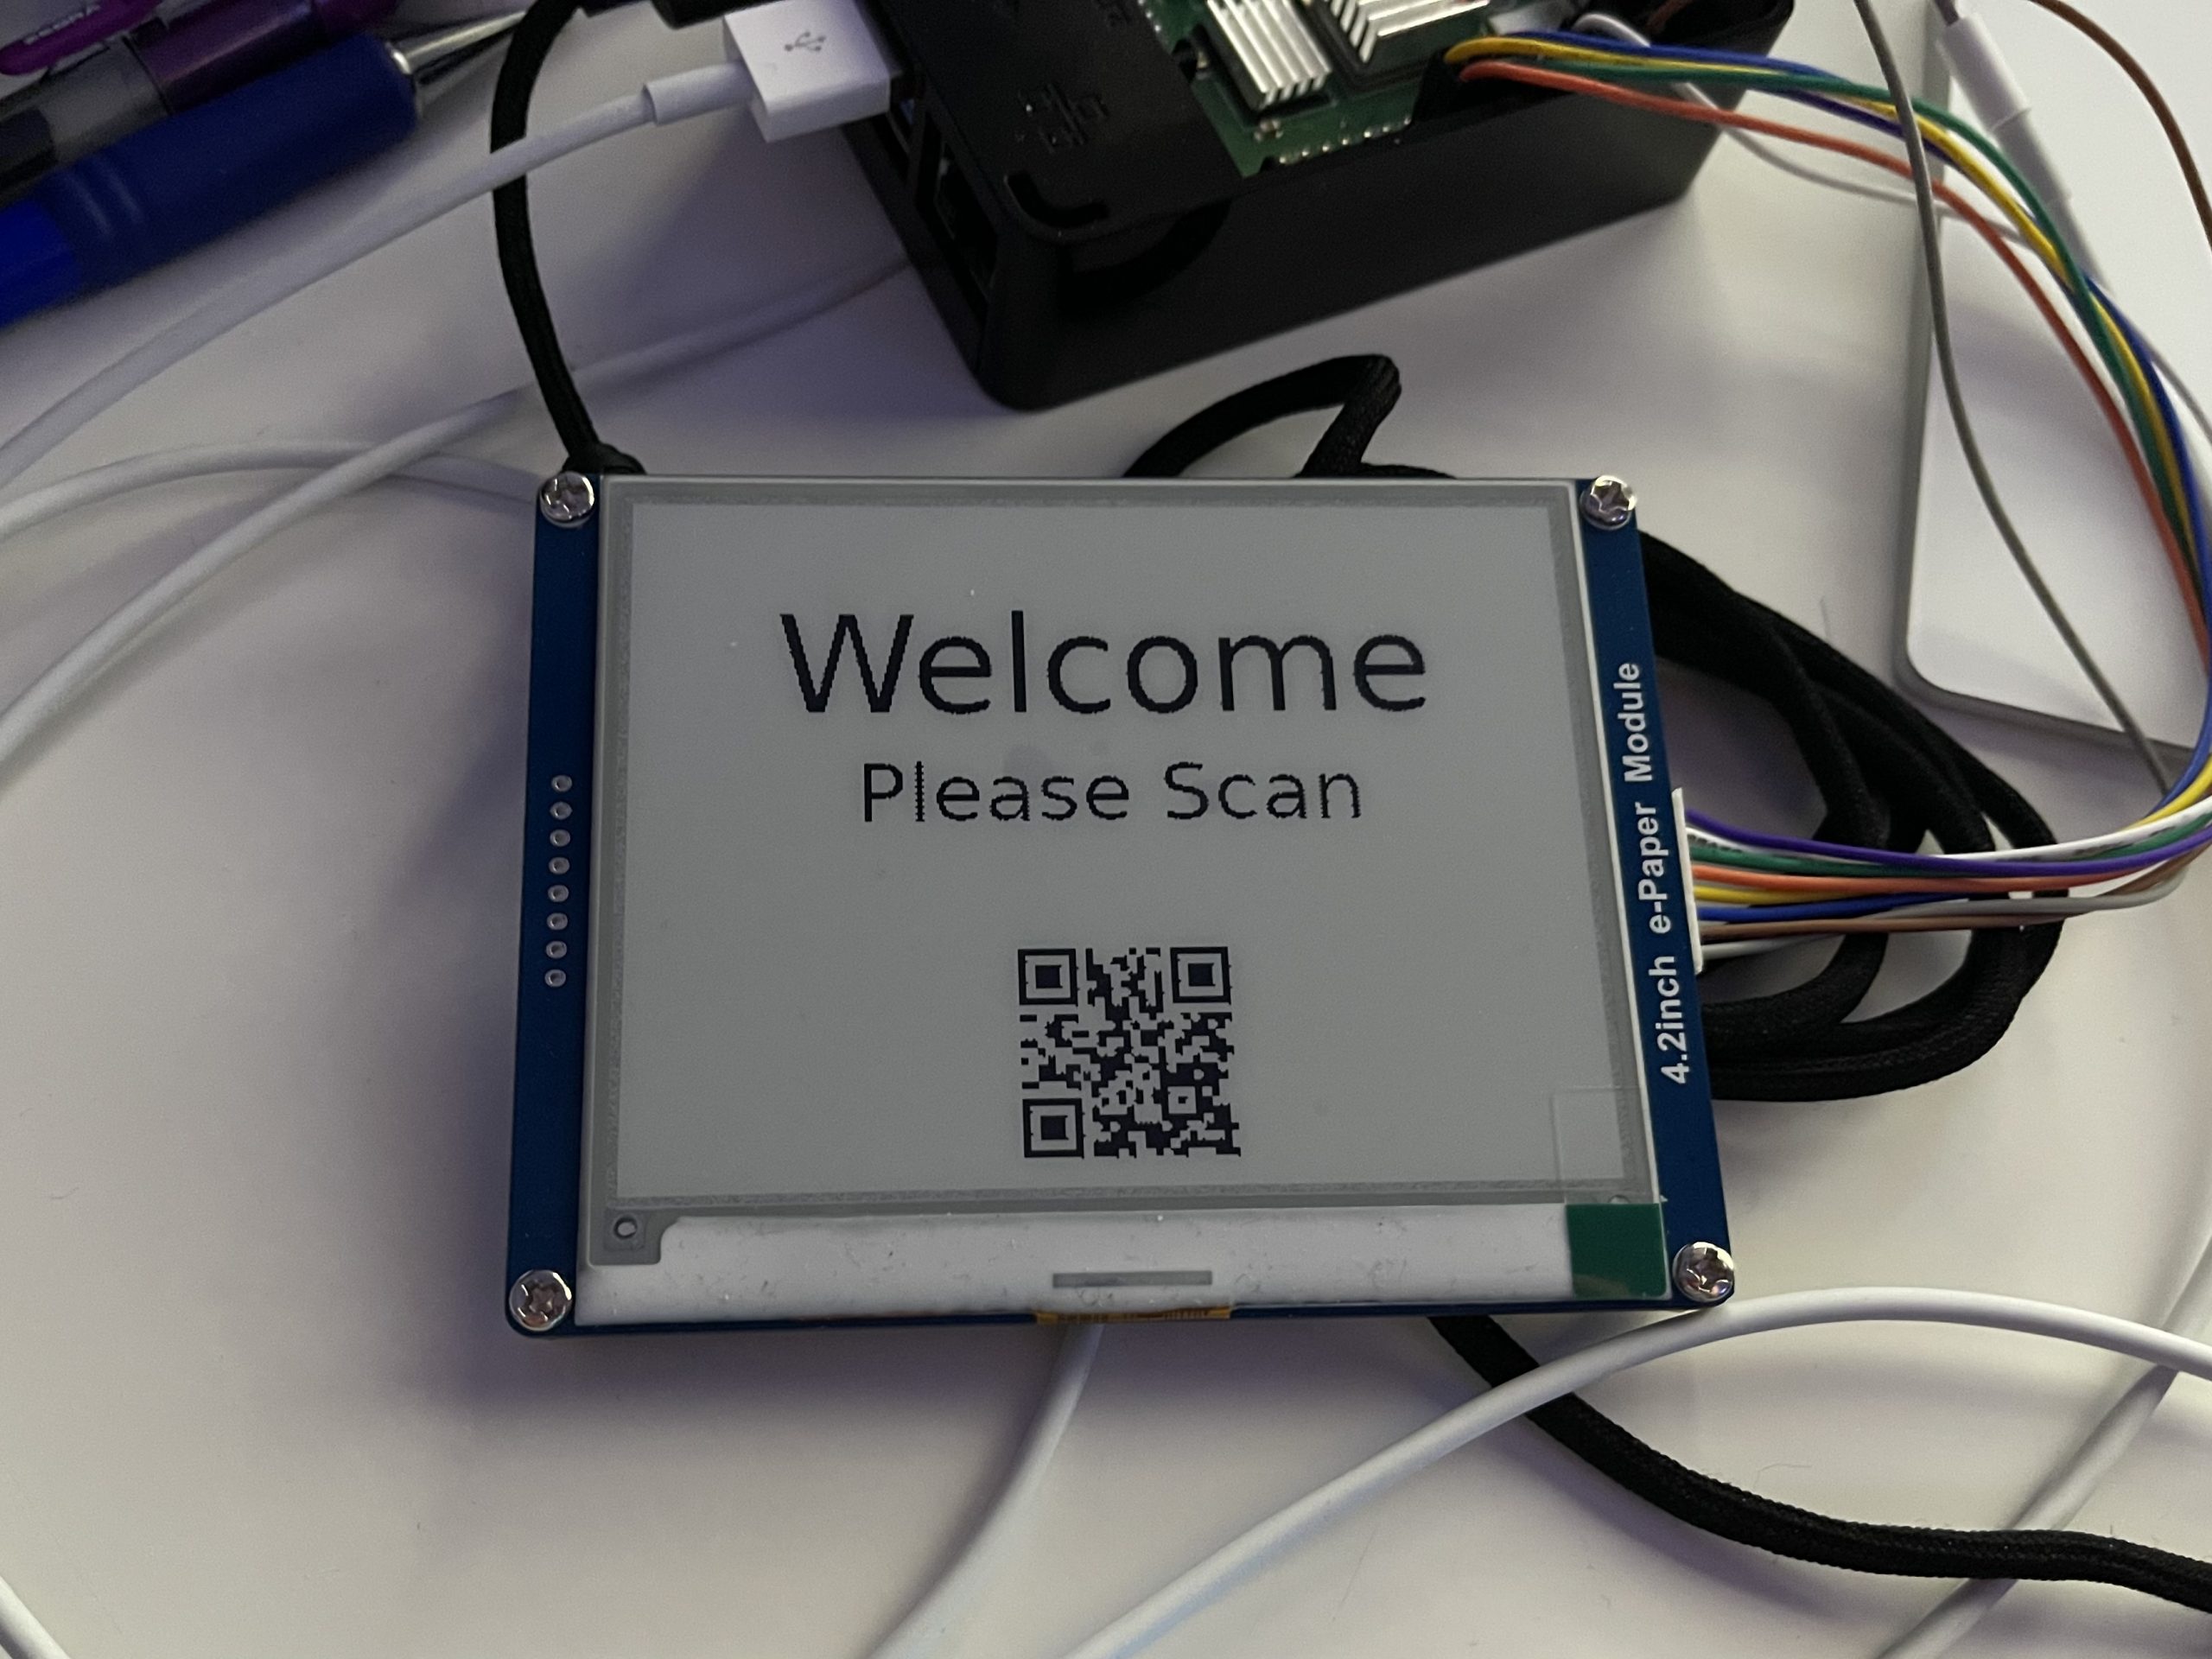
Here’s how it works. A visitor arrives to your office and no one is attending the front entry area. A visitor sees this:
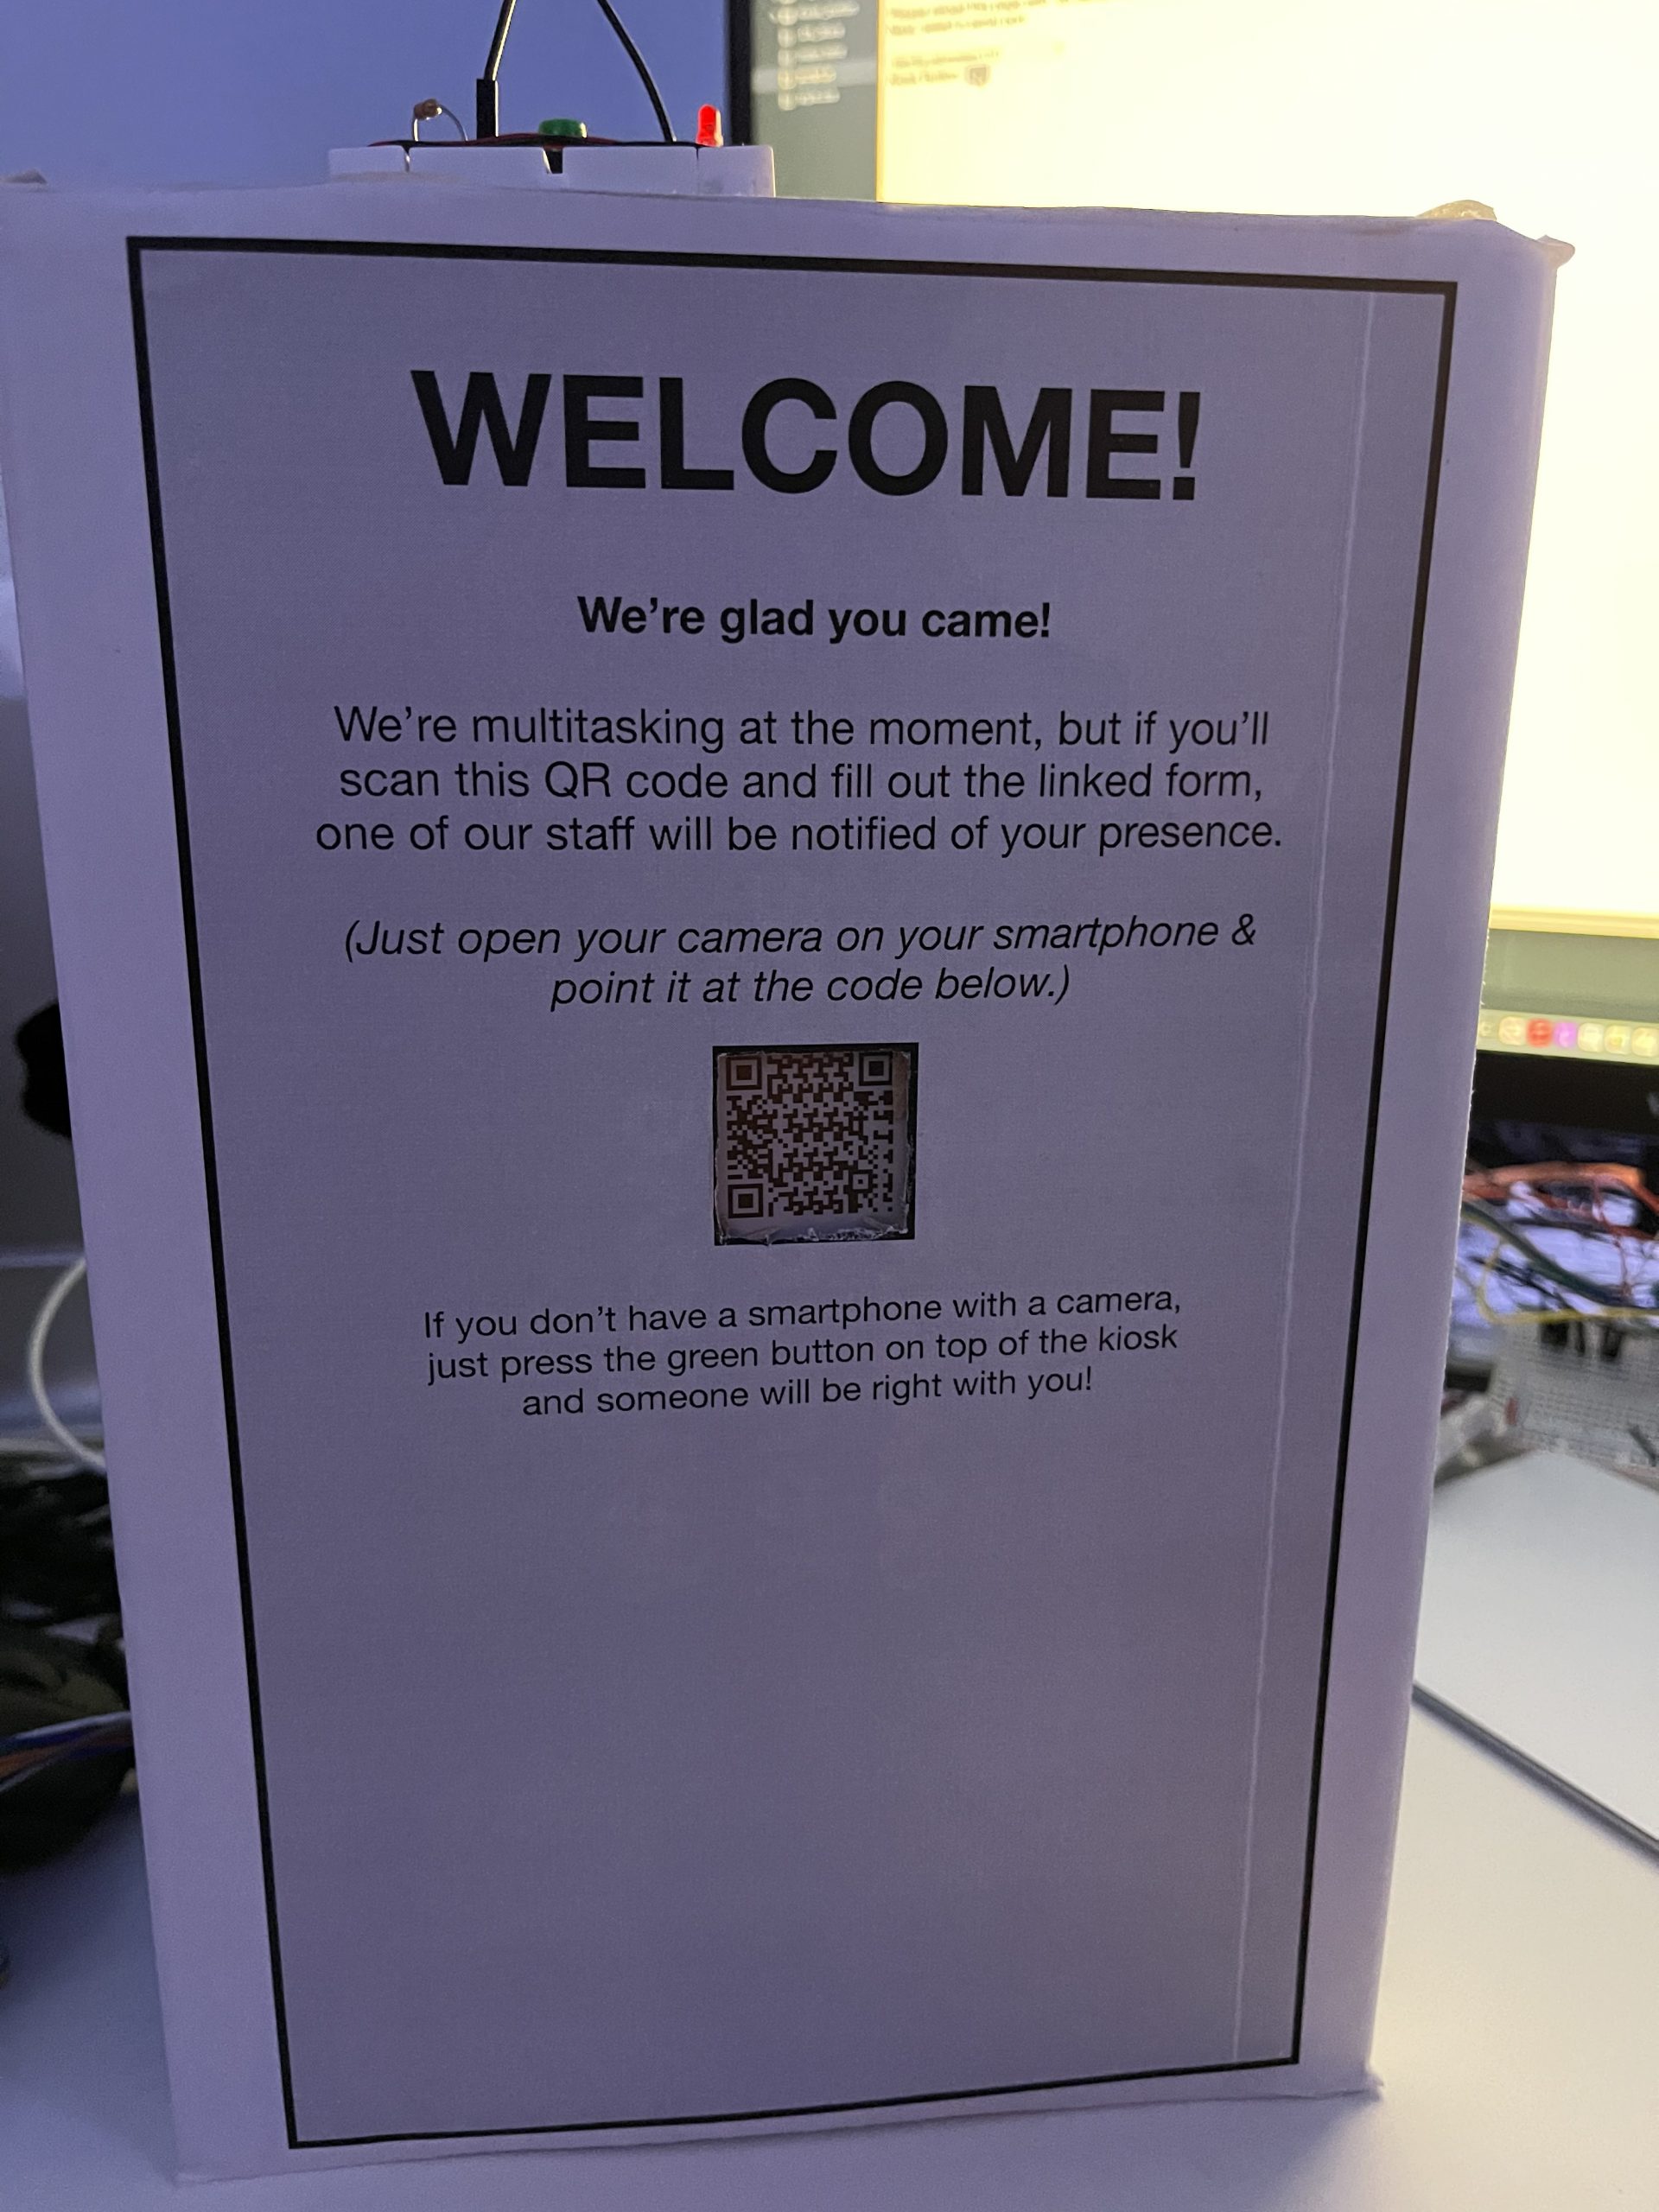
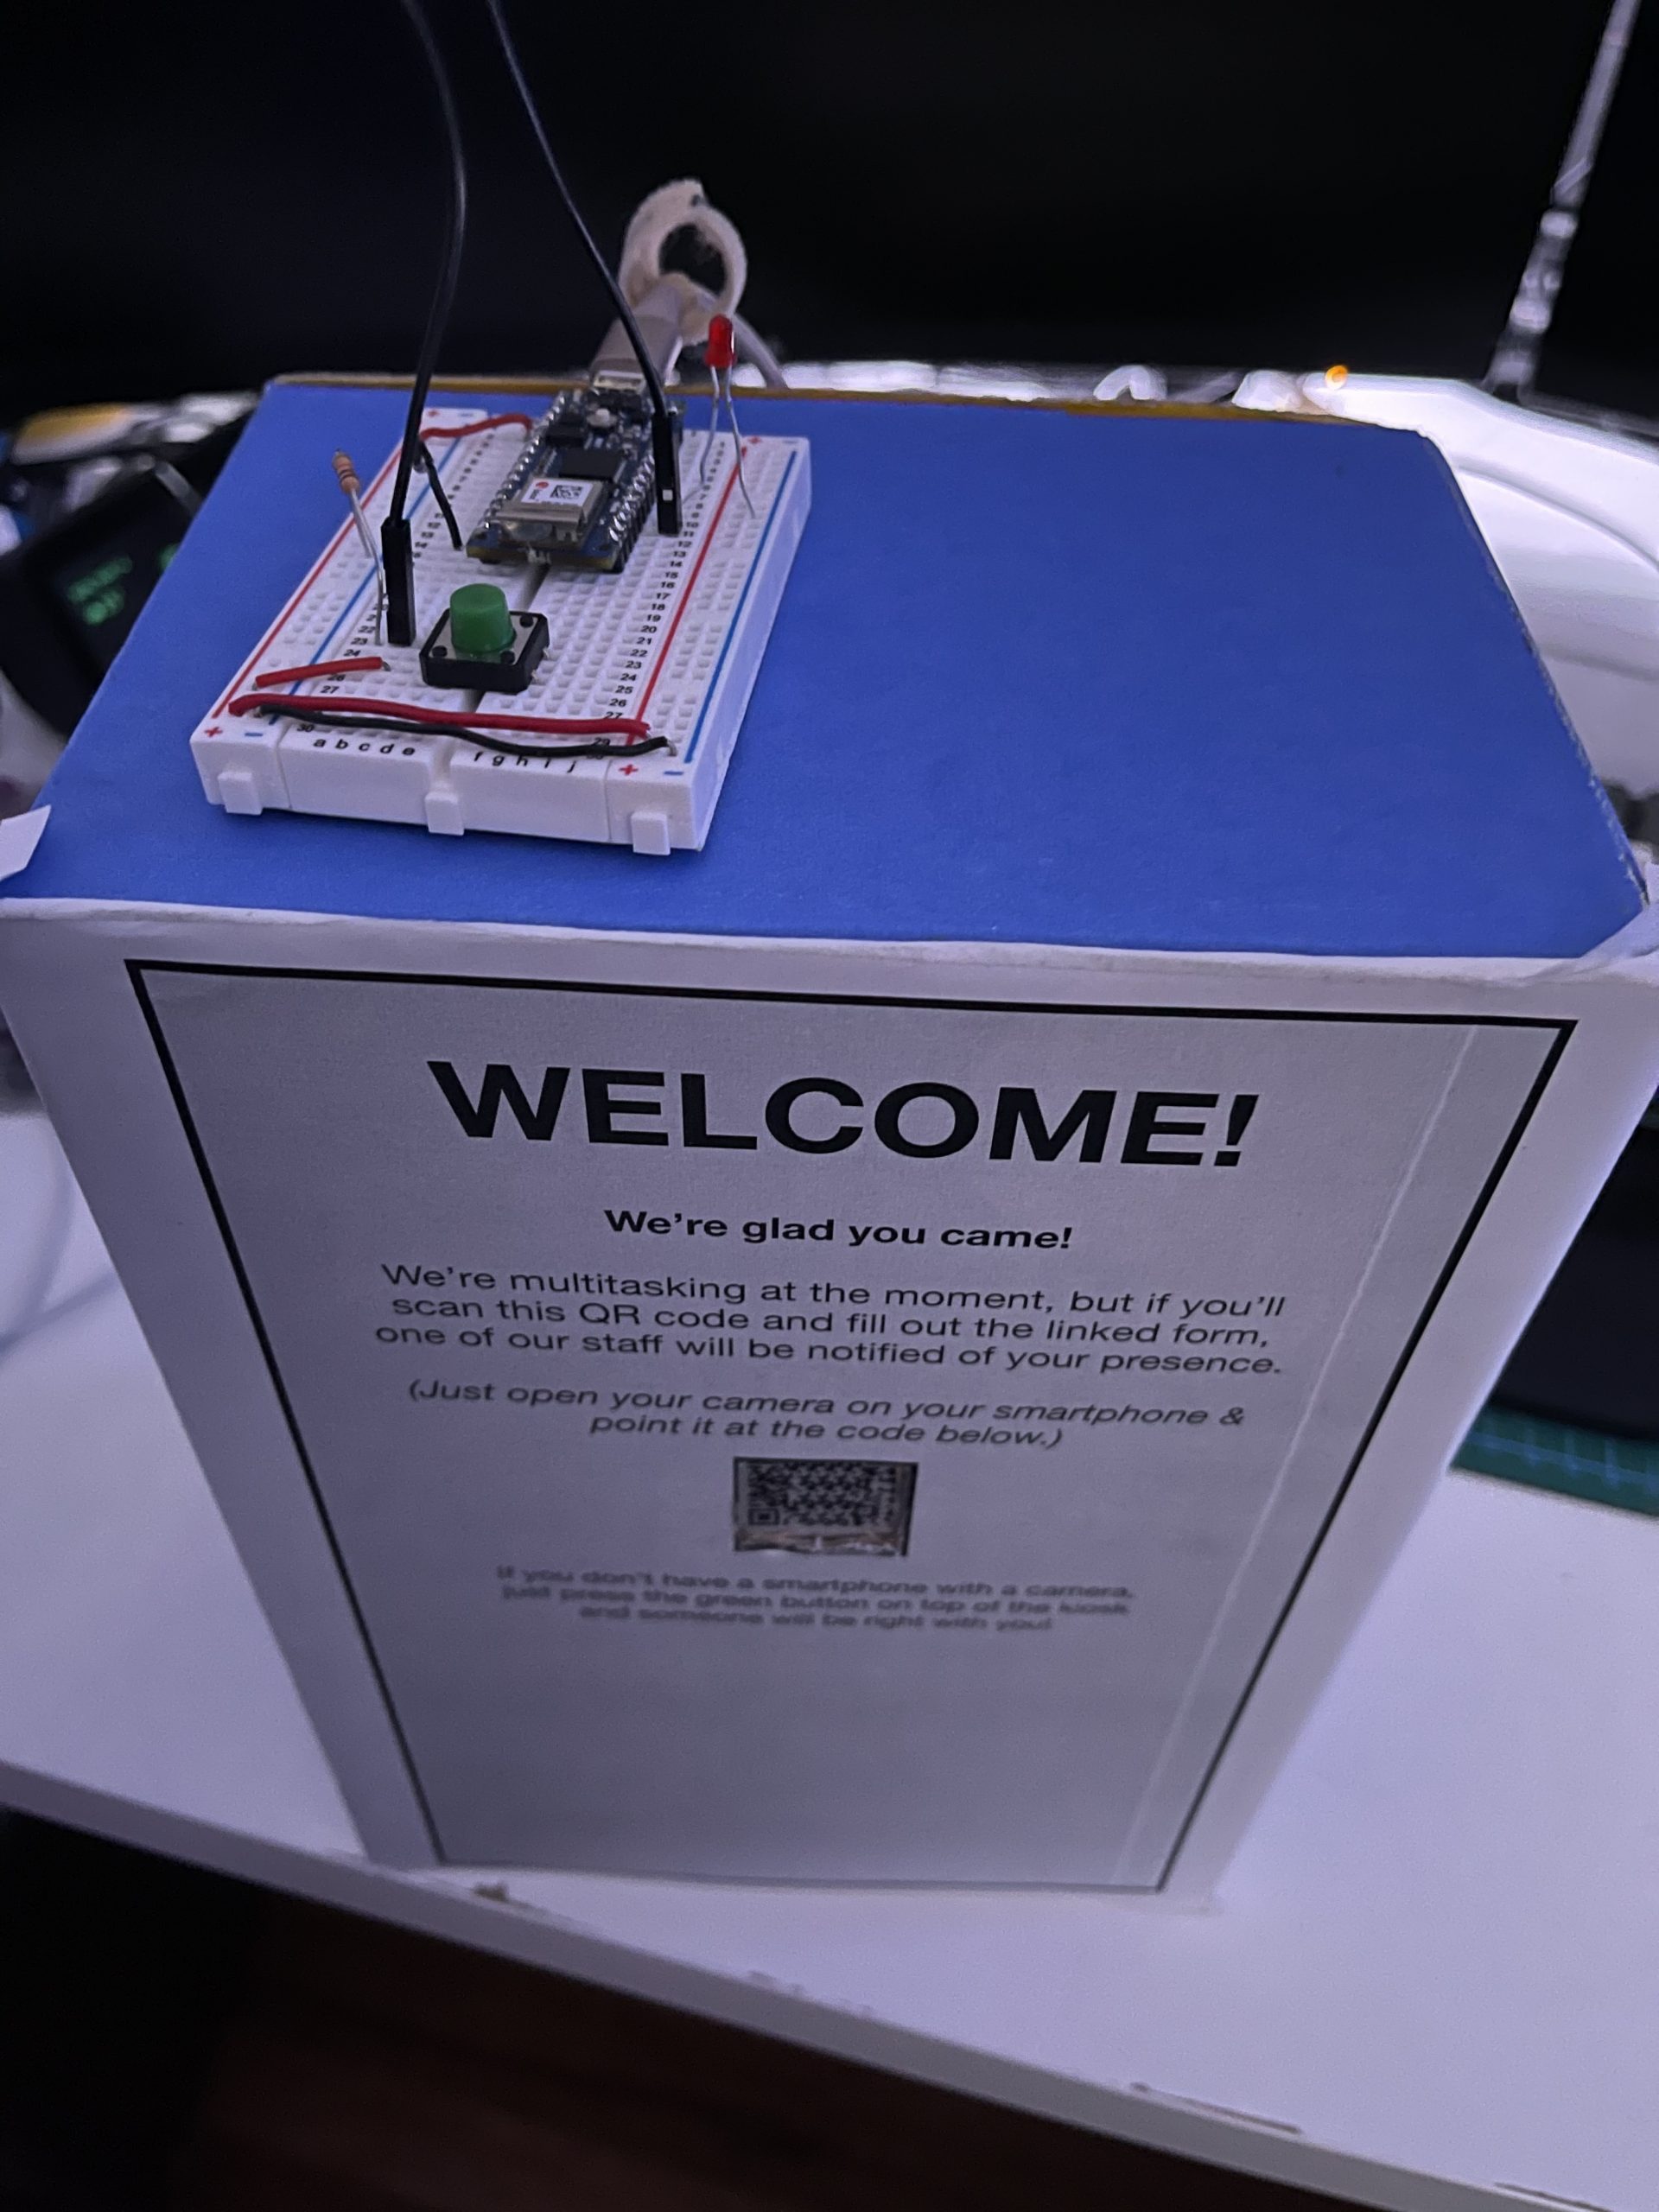
The text of the Visitor Kiosk reads:
WELCOME!
We’re glad you came!We’re multitasking at the moment, but if you’ll scan this QR code and fill out the linked form, one of our staff will be notified of your presence.(Just open your camera on your smartphone & point it at the code below.)
If you don’t have a smartphone with a camera,just press the green button on top of the kiosk and someone will be right with you!
Here’s a video I made of the button interaction:
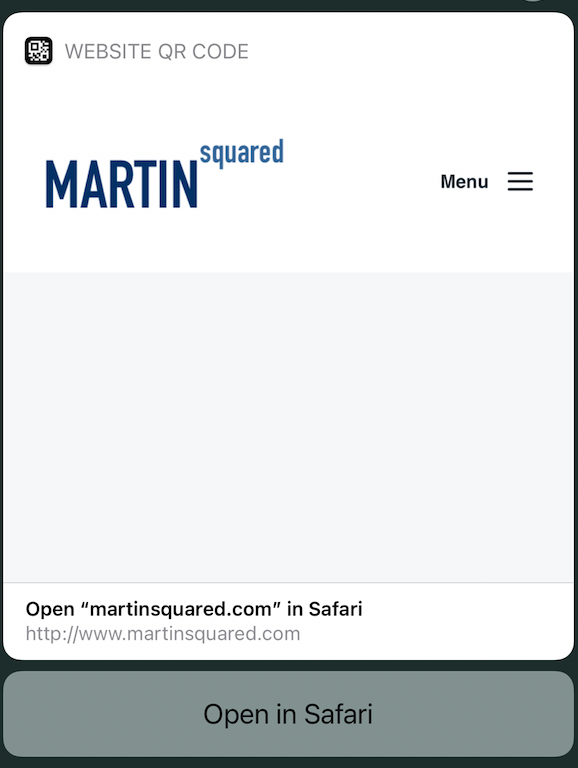
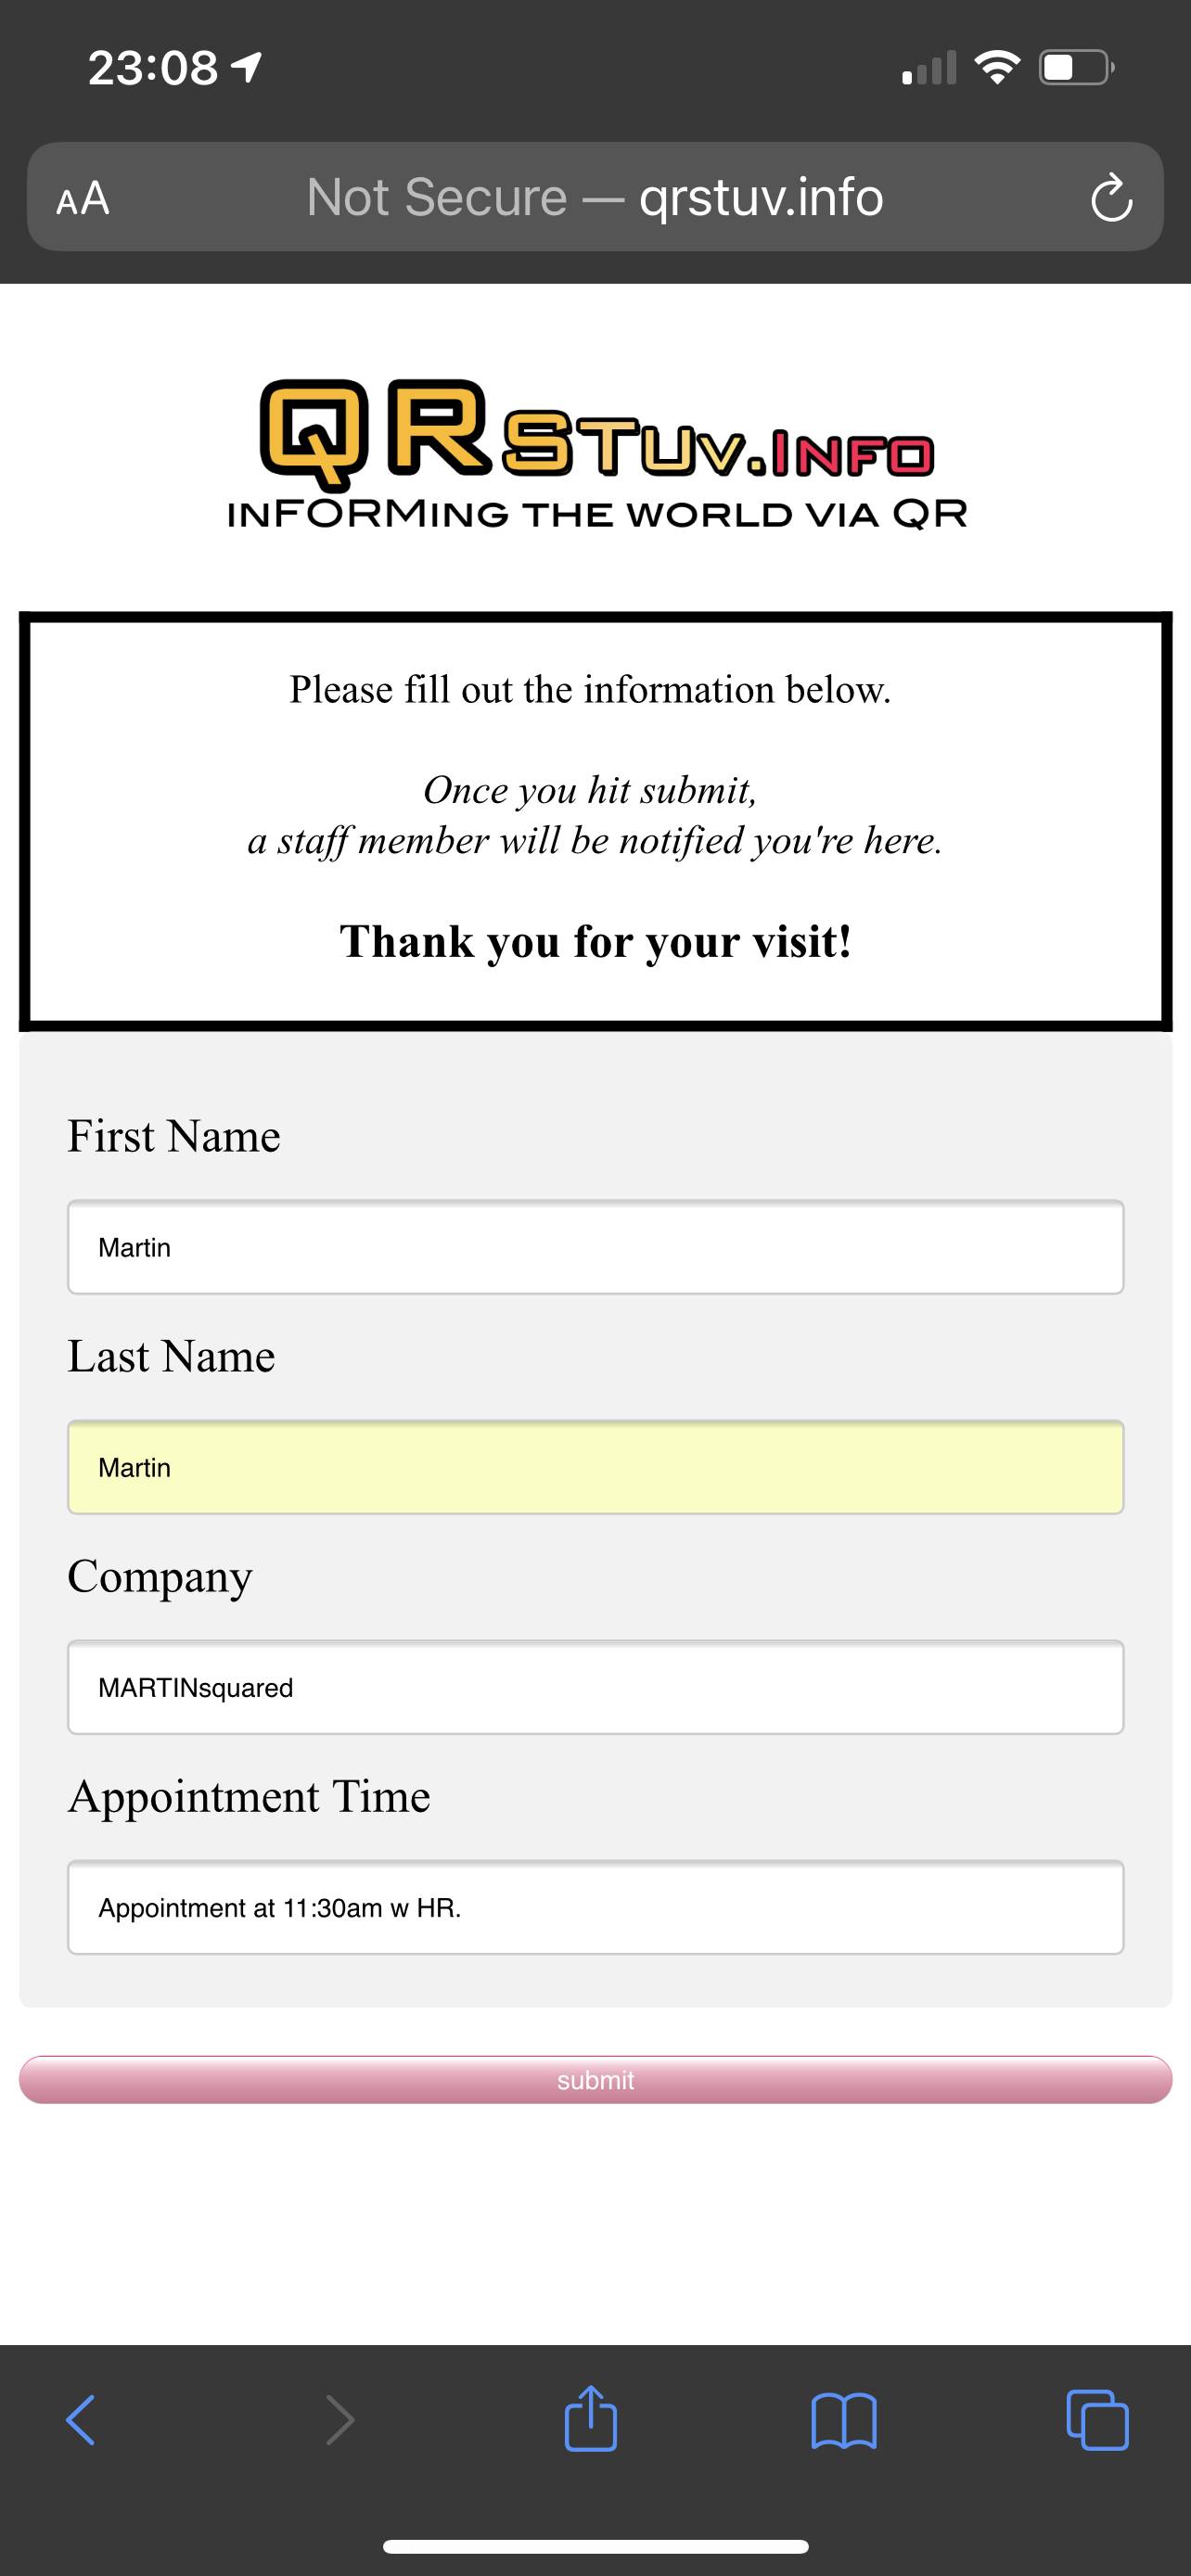
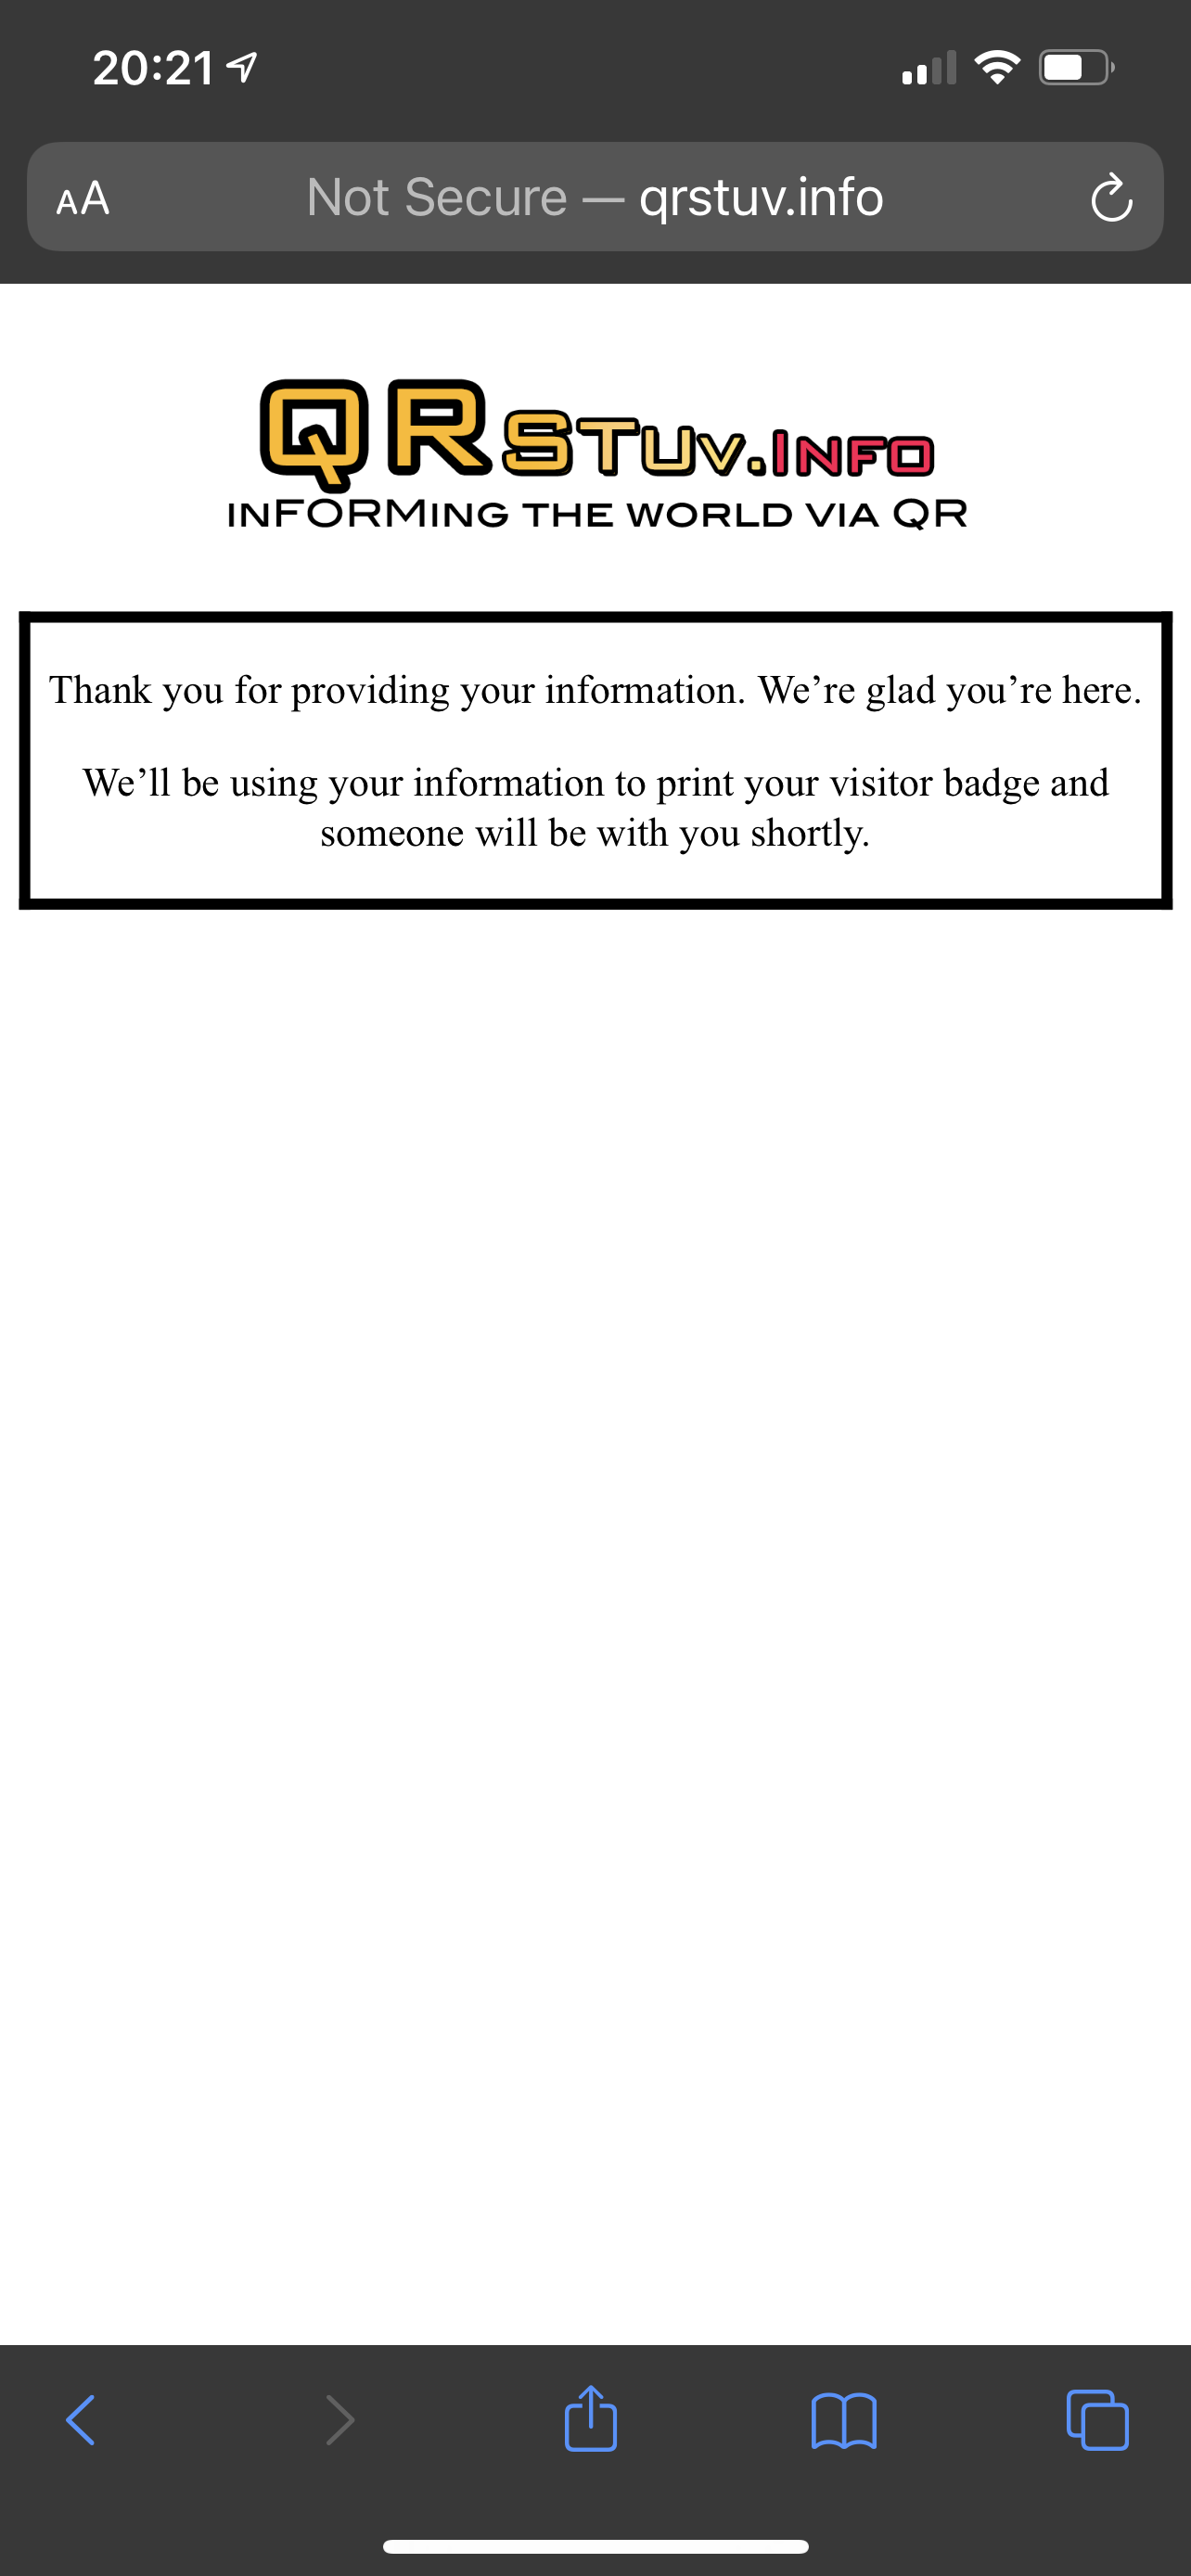
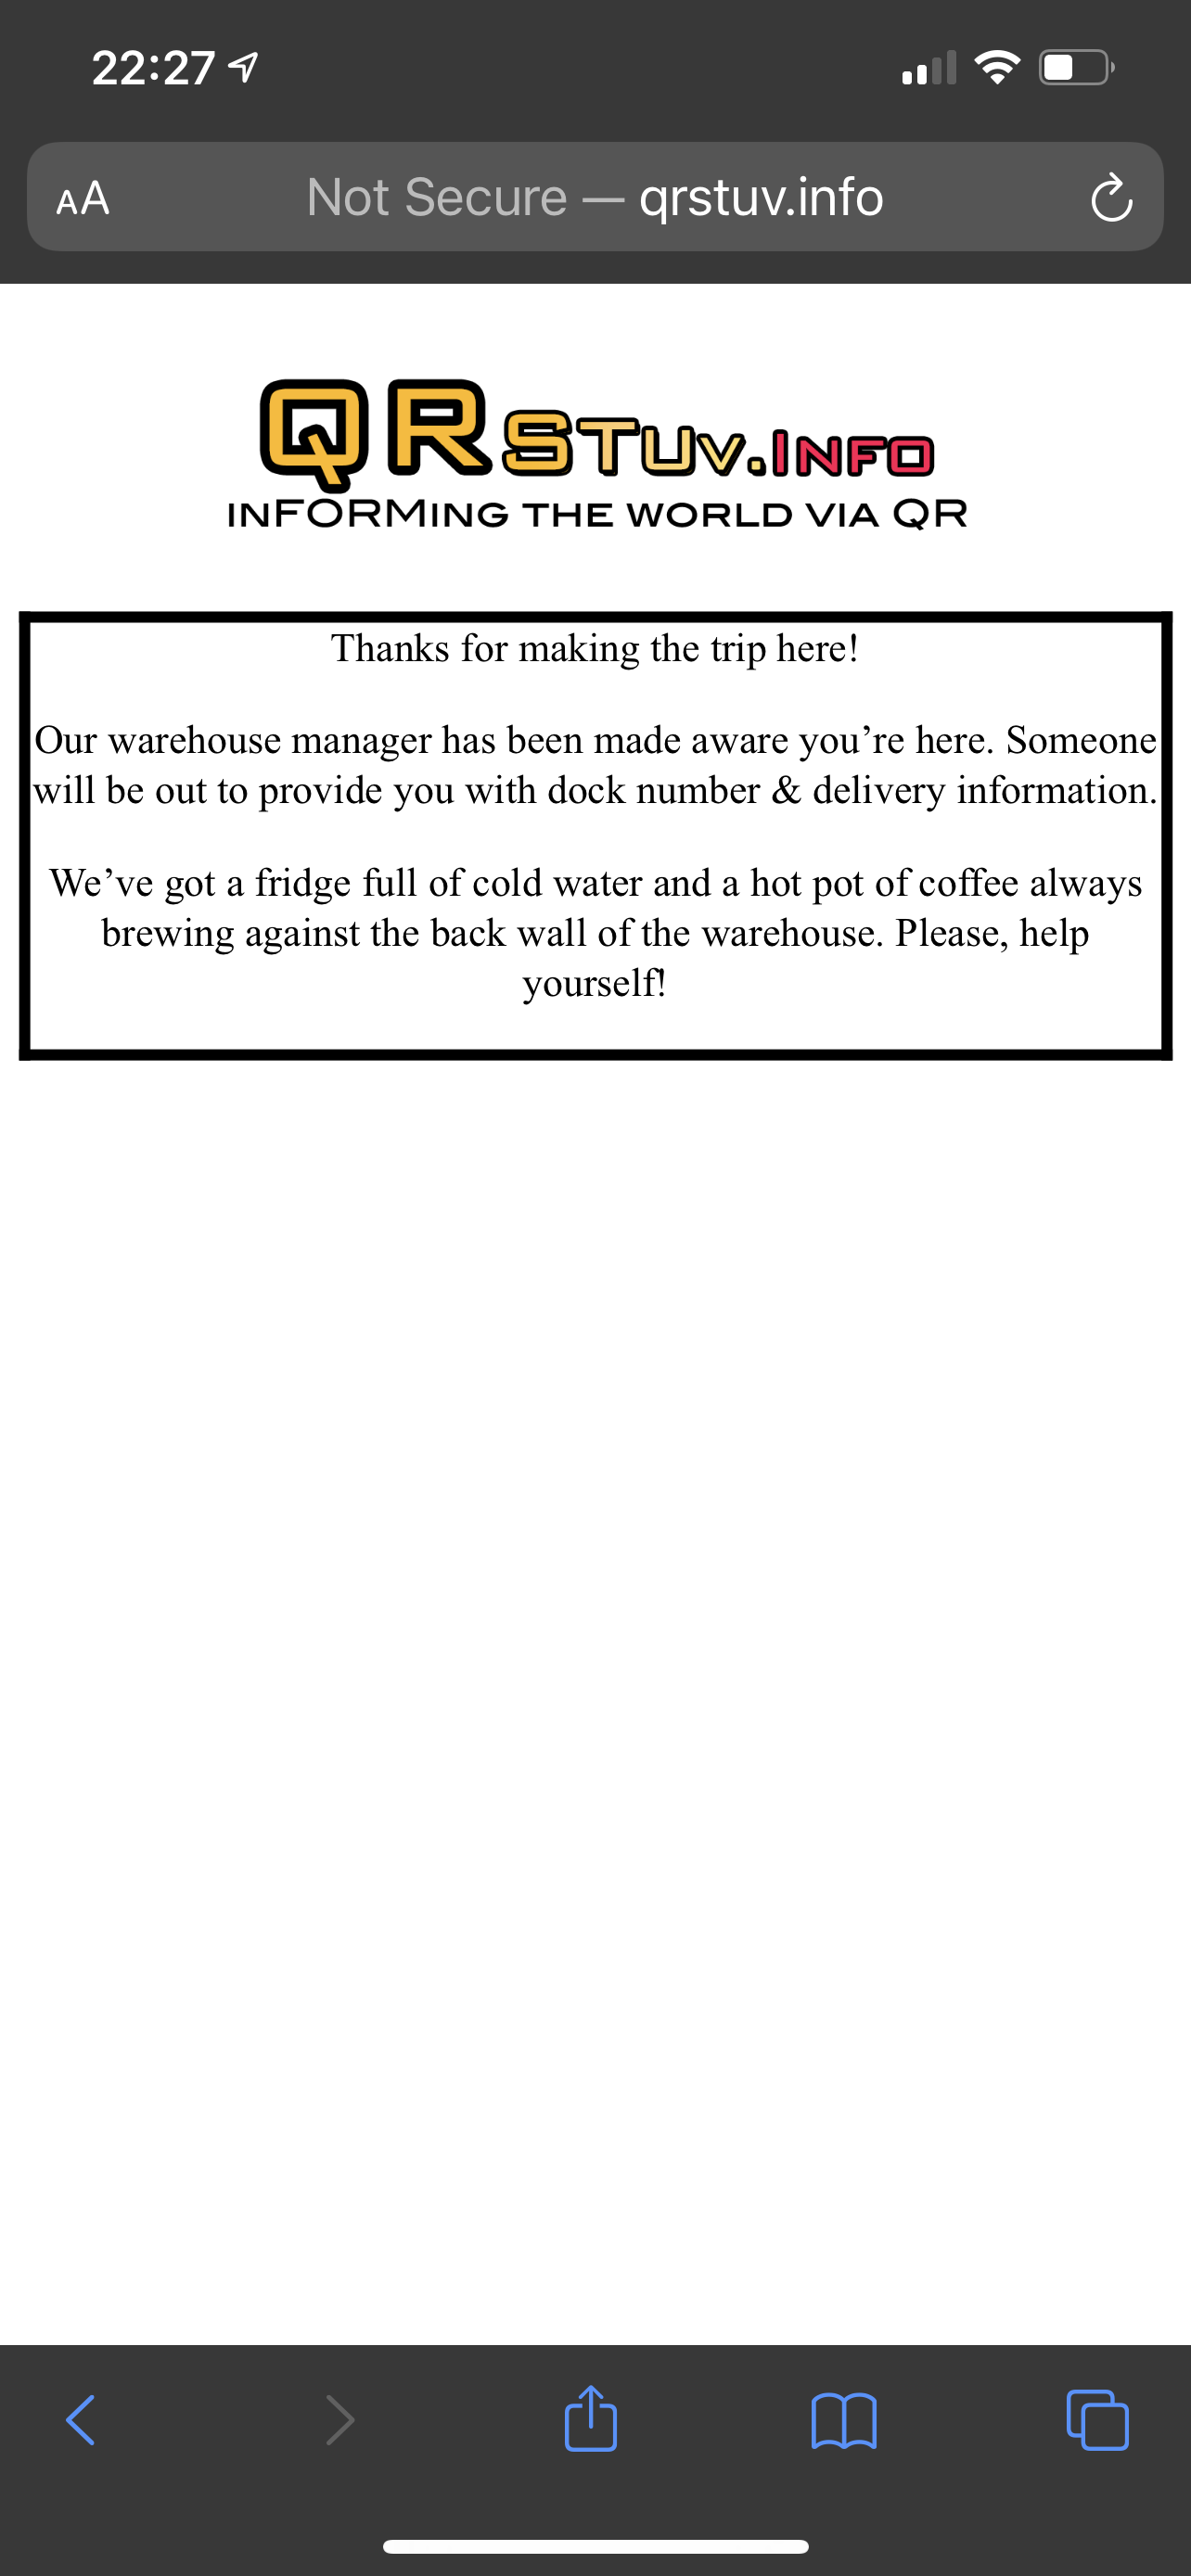
If you have a device capable of scanning the QR code, you’ll be directed to a page like this:

From there, there are custom forms for the different types of Reason for Visit as well as thank you screens:


On the staff side, they would receive an email when the form is submitted… each type of submission going to a VIP email address that alerts the appropriate staff member of the visitor’s arrival.
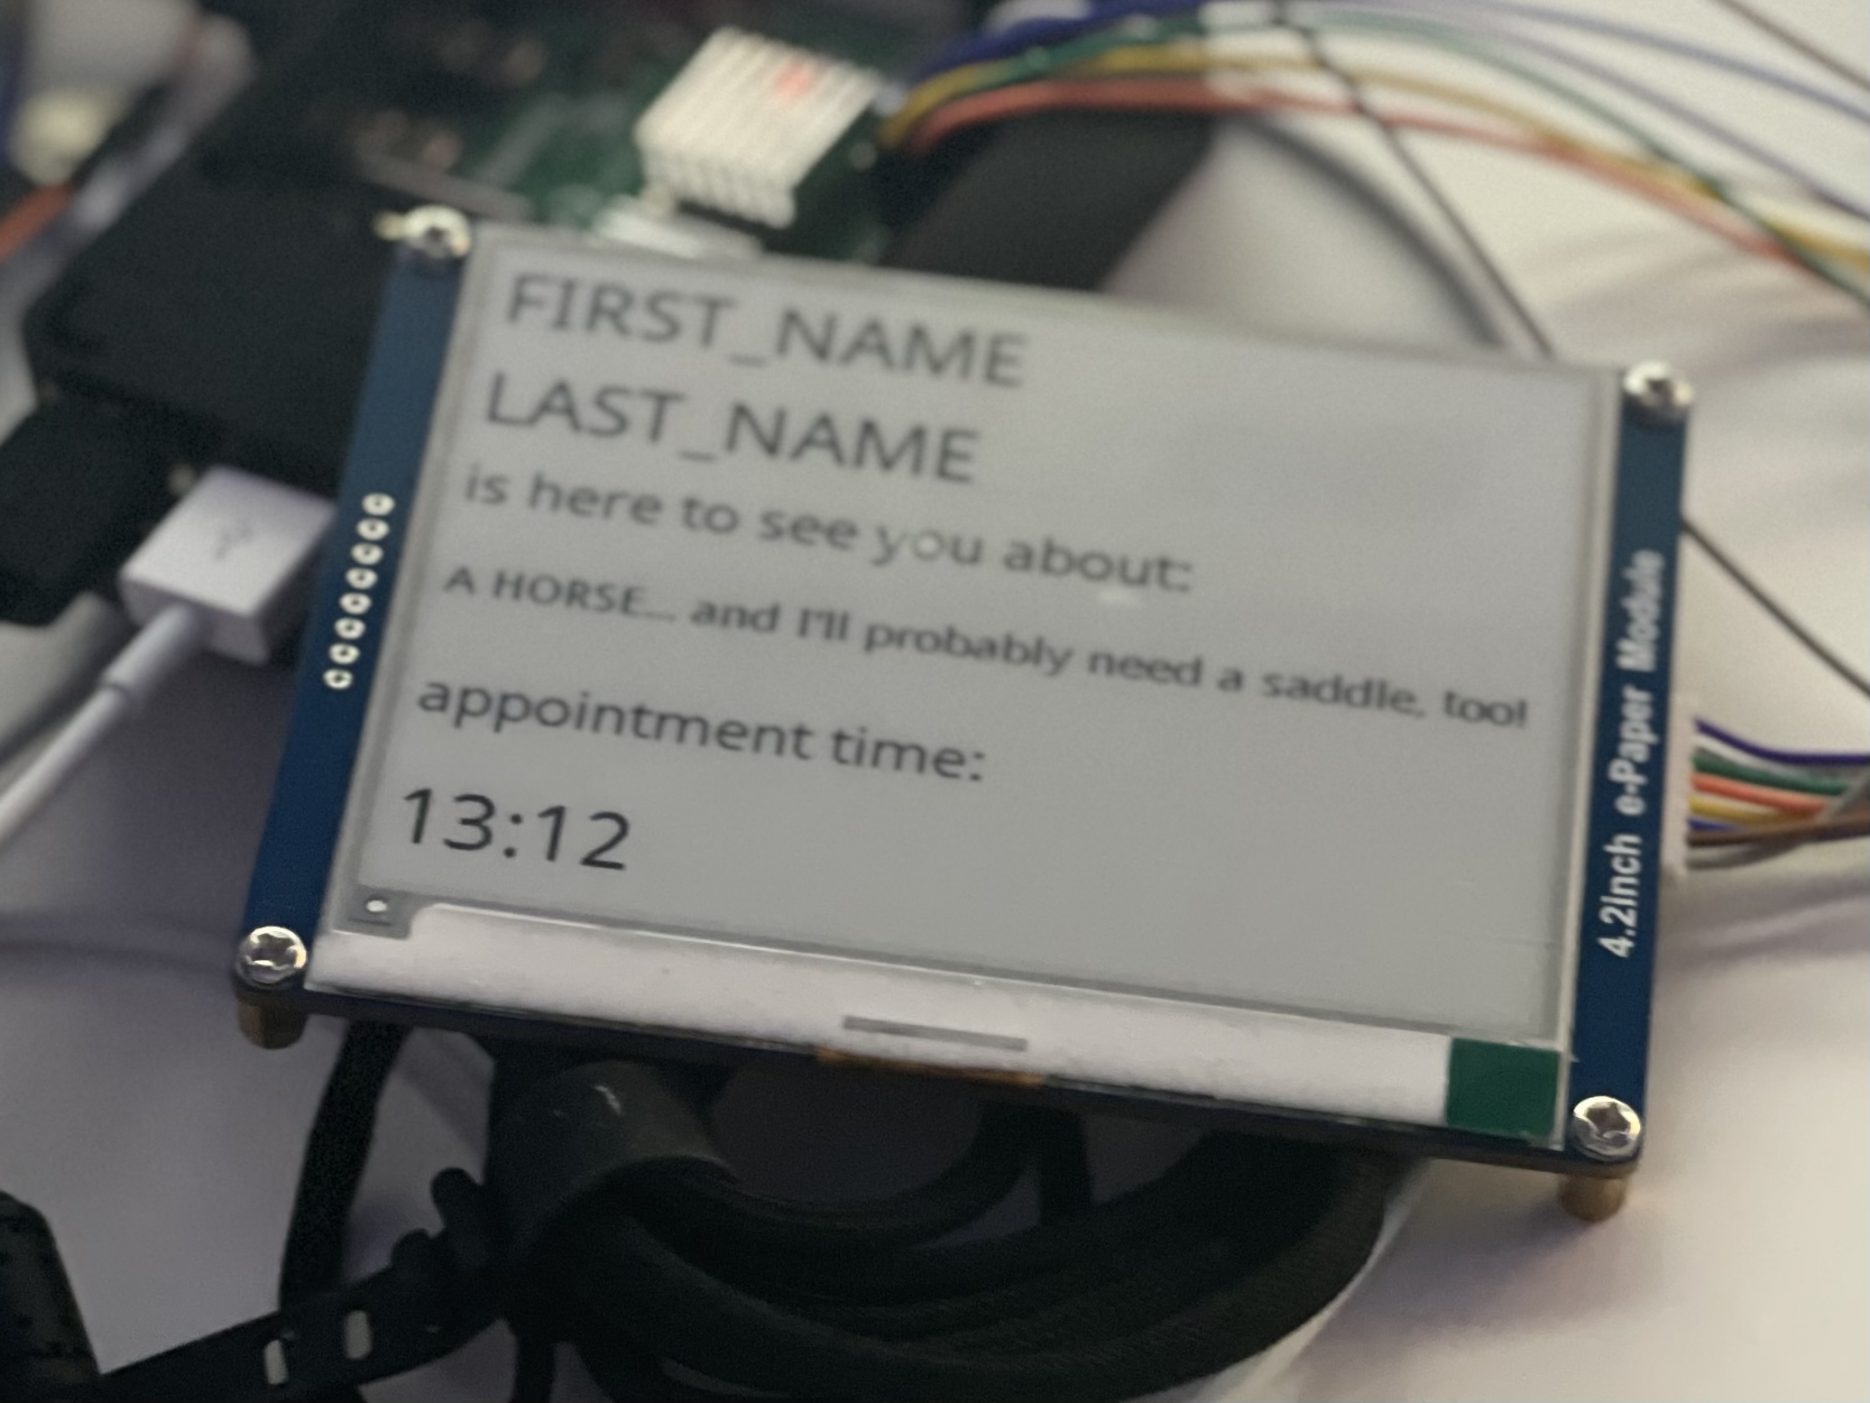
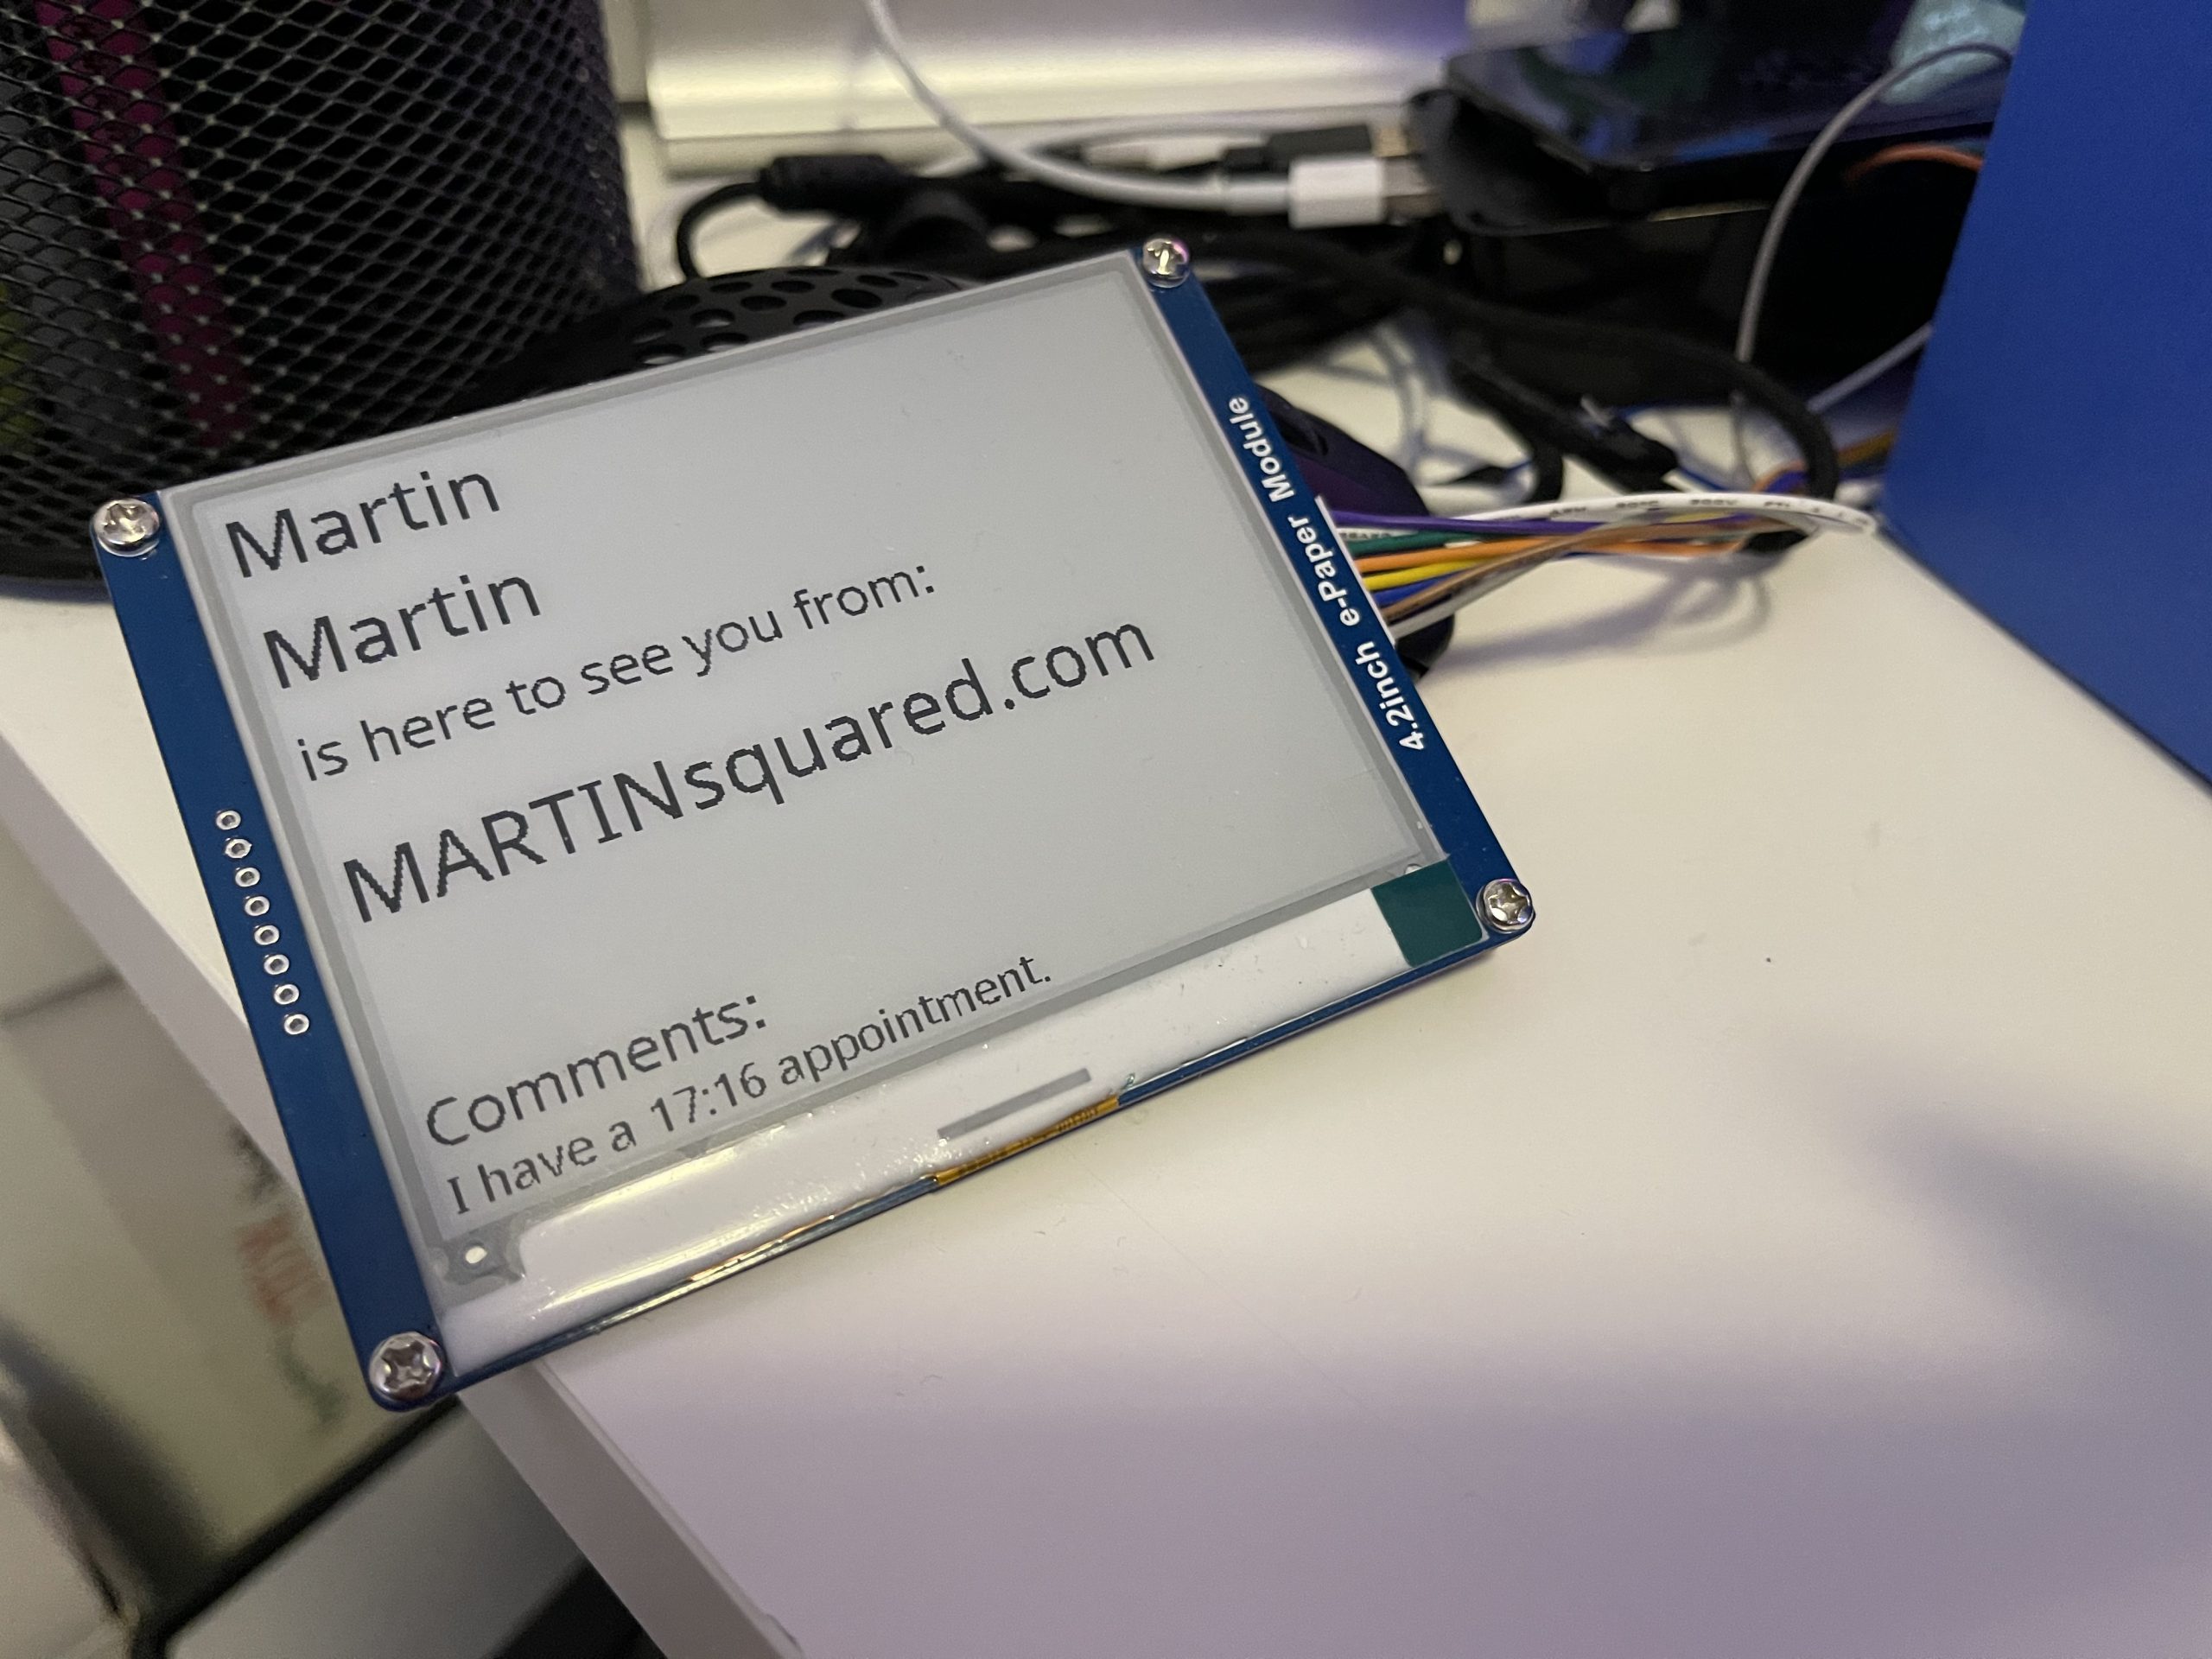
The information from the form could also be added to a spreadsheet that, when updated, would refresh a screen with the relevant information. For example:
Here’s how I approached it:
[I was hoping to get the form to load to a Google Sheet automatically, but I didn’t have the time to get it figured out. That said, the information from the form will still be emailed to and can be manually entered into the Sheet.]
Cool, huh?
The Project
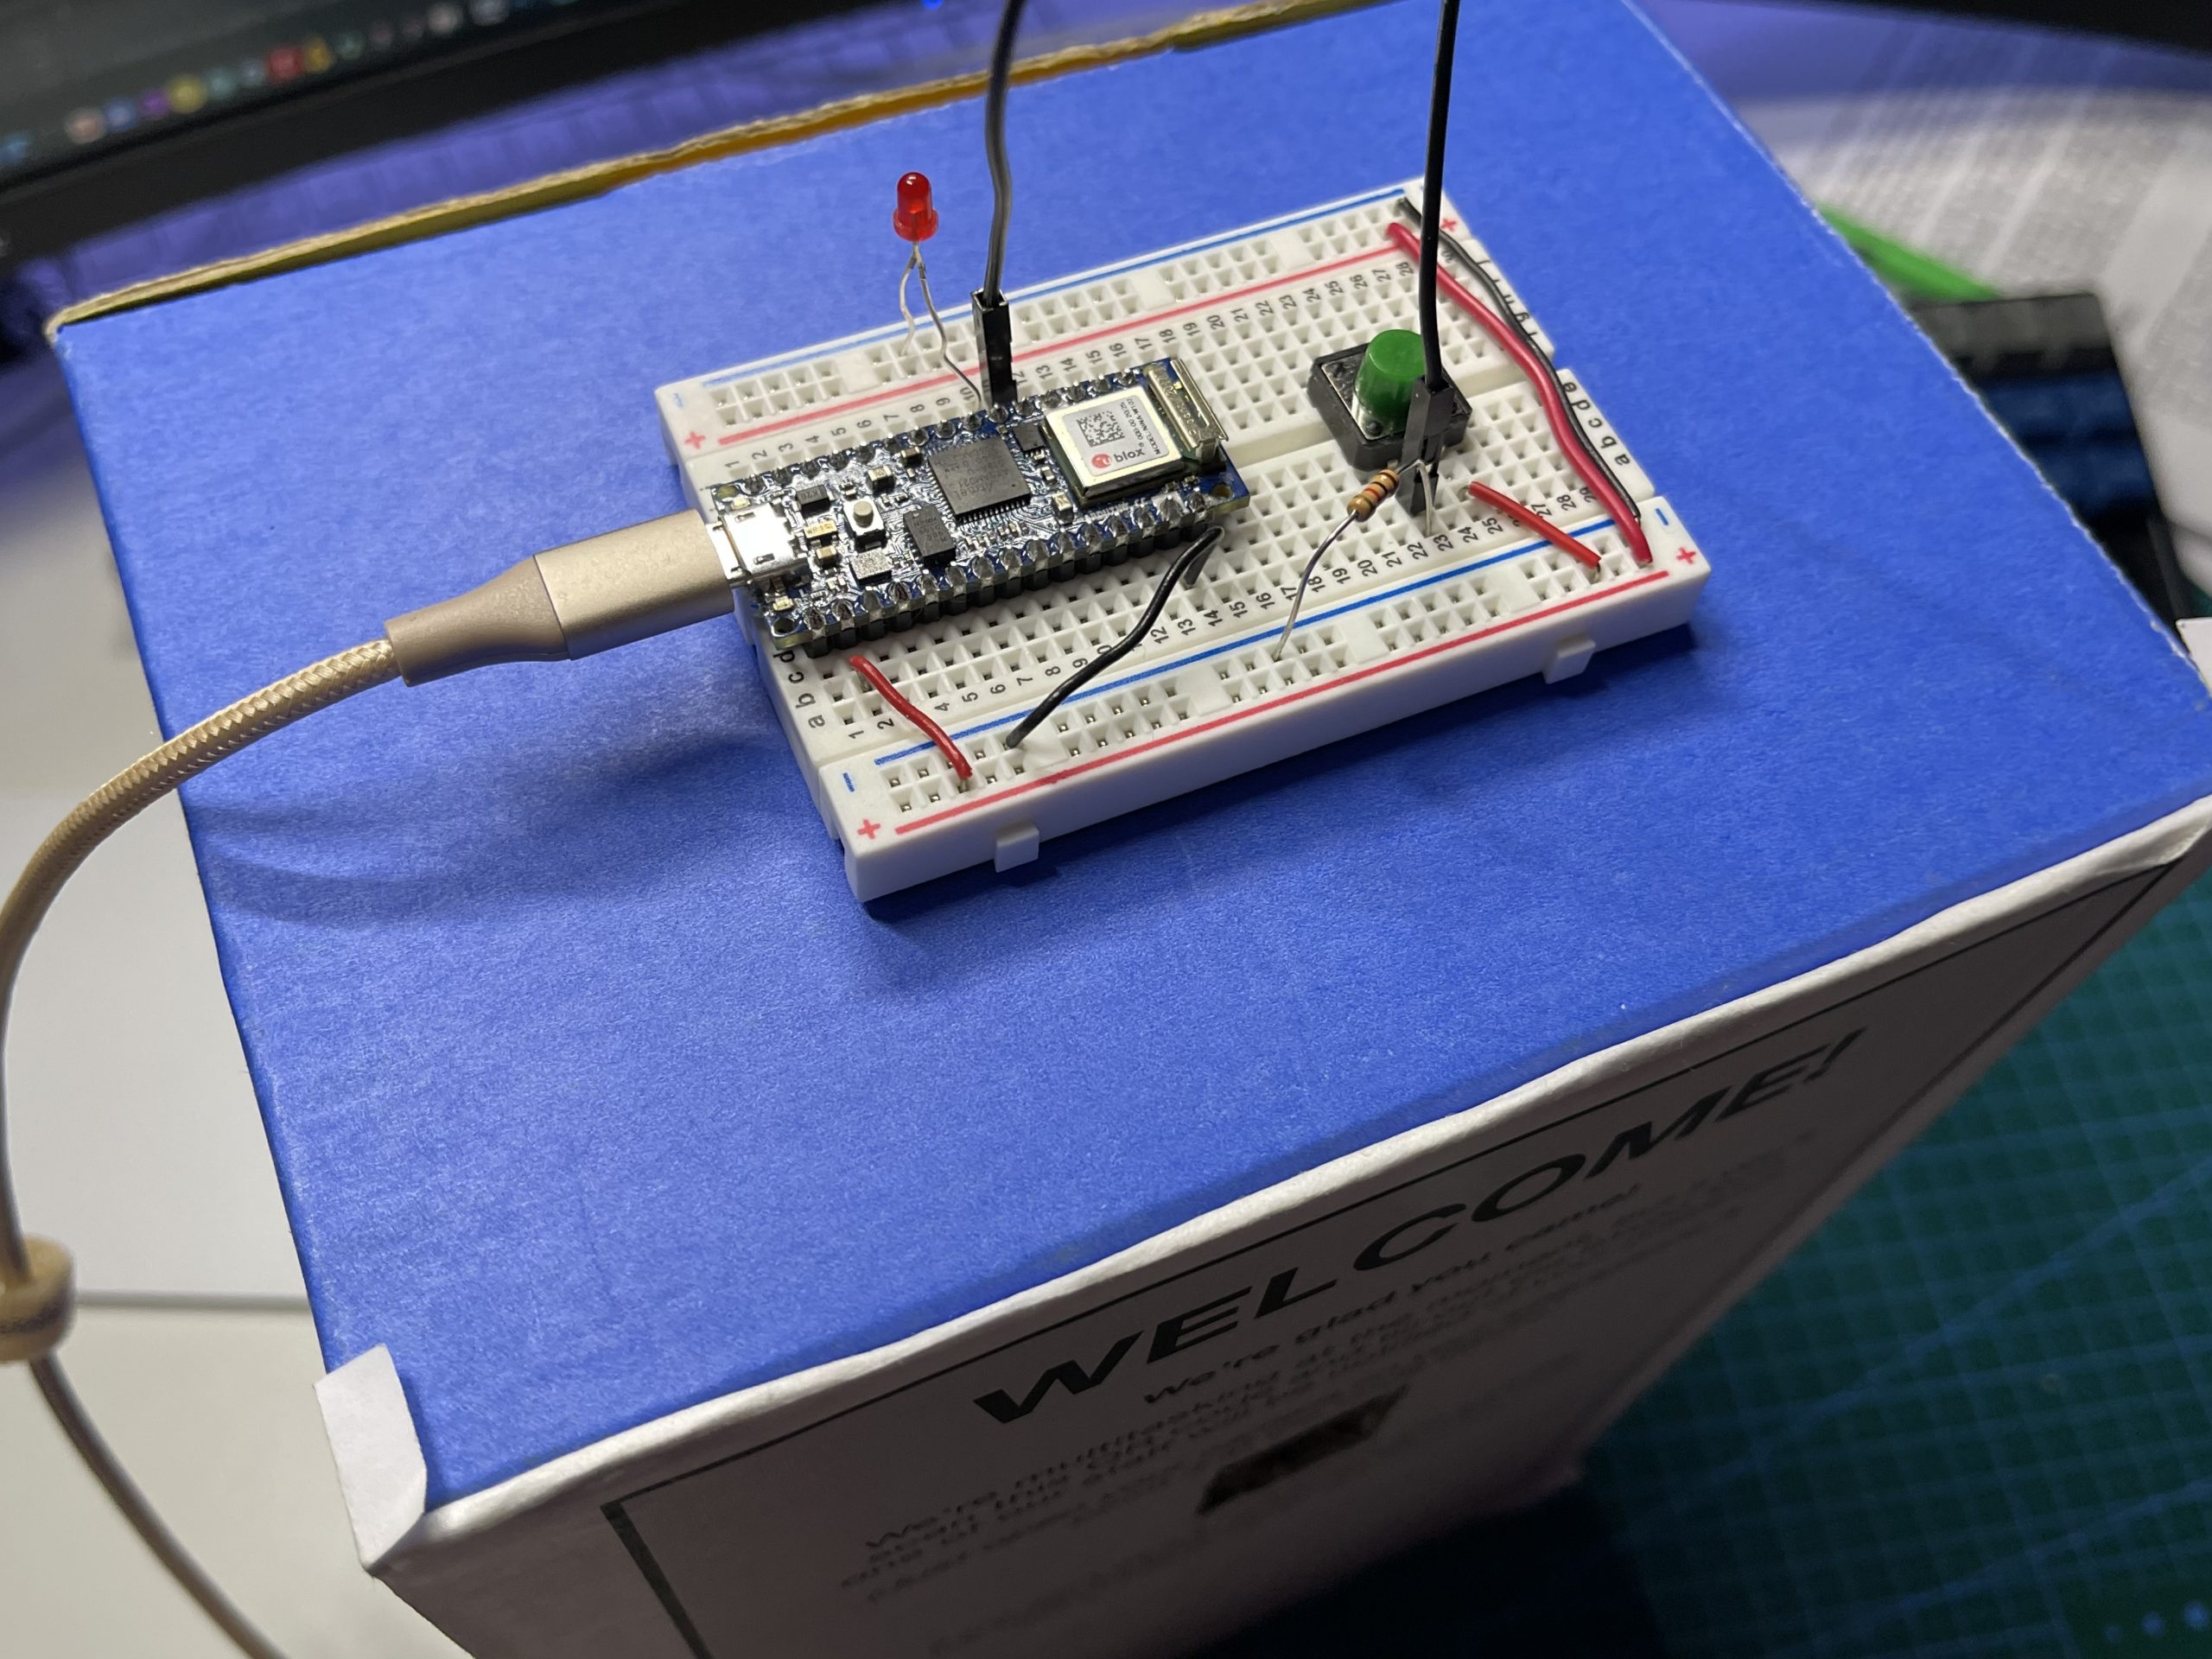
If you’d rather just read (my best attempt at) a description of my project, I attempted to create a system with a check-in kiosk (created with small businesses/offices in mind.) The goal was to have a kiosk that has a screen displaying a QR code and a button to facilitate visitor check-in. The button would be for people unable to use the QR code. The button is connected to a screen visible to office staff that would display a large, clear message that a visitor has pushed the button. This button would also be suggested for walk-in visitors who need to speak to someone immediately. The staff could turn off this light from a synced button on the screen.
When someone scans the QR code, it would take them to an online form that would have them fill out the reason for their visit as well as other information including as name, company, and comments. This information would be entered into a Google Sheet and a high-alert email would be sent to the appropriate department via a specific visitor email account—which could also serve as a visitor log. The information in the sheet would be checked by a script that would display any changed info onto the screen.
So, how’d it go?
Actually, slayed a lot of this crazy, connected hydra! I’ll be honest, I only have this class and thesis for the first part of the semester, so I was able to spend a good 24+ hours (7 hours getting the 4.2” e-paper screen to read from the spreadsheet and check for updates, 10 hours getting the forms set-up AND WORKING!, 5 hours connecting the breadboard to the screen and troubleshooting [mostly, troubleshooting], and another 5 hours chasing rabbits on how to connect my HTML form to my Google Sheet… and, ultimately, getting myself blocked from Scripts) over the last 5 days working on the different parts of this. I would have spent more time, but then realized I’ll probably spend a couple few more hours setting things back up and documenting what I’ve done (fortunately, I kept a lot of the links in a list… unfortunately, I’ve had to rewrite some of this because I forgot that I went down a different path for a solution…) Also, I knocked myself off-course a few times accidentally confusing mac/rasp pi keyboards and typing into parts of code I shouldn’t have… lots of ß’s!
I had a lot of fun. Don’t get me wrong, there was a lot of head scratching and sighing… and maybe a bit of French… but I really enjoyed getting the parts of this to work. This project took me on a journey through multiple parts of the coding world—I revisited parts of PHP that I hadn’t touched in probably a decade and learned about a neat way to schedule processes called ‘crontab’. This project’s path also includes some: C++, Python, as well as HTML, JS, CSS and even a XBM file. (Not to mention a breadboard, a push button, couple of e-ink displays, an Arduino, a Raspberry Pi, a slew of jumper cables, and exponentially more web browser reloads.)
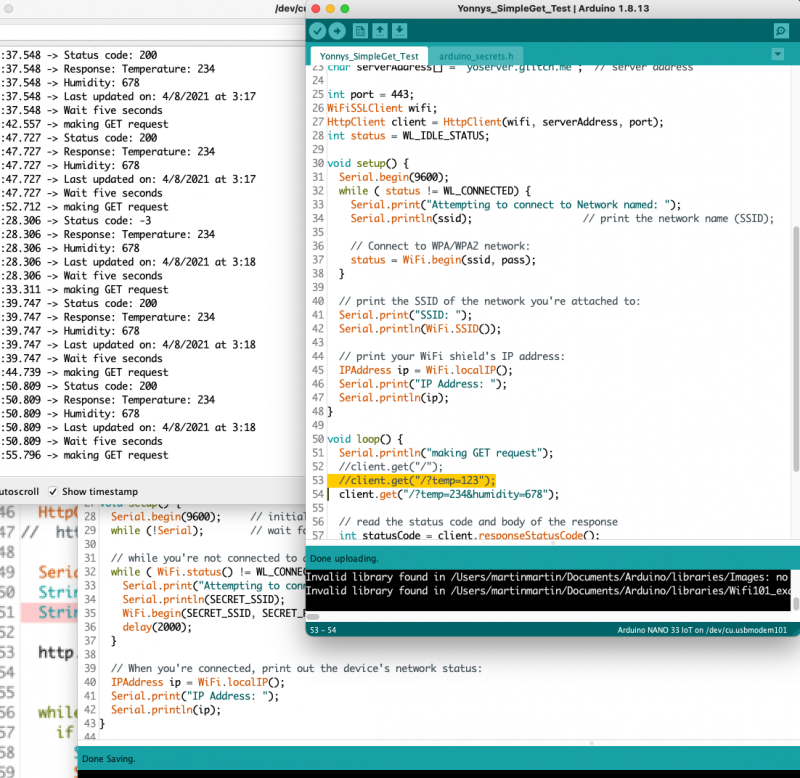
In terms of functionality, here’s what I got to work: I got the 4.2” e-paper screen to display information from a Google Sheet. I followed the tutorial from here and had to make some modifications. (Thanks for the great tutorial, btw!) It also involved setting up a Google Docs API account which was fairly simple and linking my key. The Python code works by getting the info from specific cells on the spreadsheet, storing them, then—the next time the code is run—checking the last cell info to the current cell info. If there’s a change, it updates the 4.2” e-paper display; otherwise, the screen doesn’t refresh.
I also got my html forms to work in terms of sending an email and collecting the info. I hadn’t used PHP in a long time, so there were several issues with getting the code to work. Unfortunately, local server testing doesn’t always equate to hosted web server functionality. Fortunately, I was able to make a few tweaks to the layout to get the results I wanted. I ended up moving the reason for visit to the first screen in hopes that I could use different fields on the next screens.
Ultimately, I made the fields the same because I was hoping to have the screen update from different visitor types. I left the Reason for Visit on the first page because having different pages not only makes the request for info feel more specific to the visitor, but it decluttered the form page on the mobile device and—most importantly—allowed me to send visitors to pages with information specific to their type of visit.
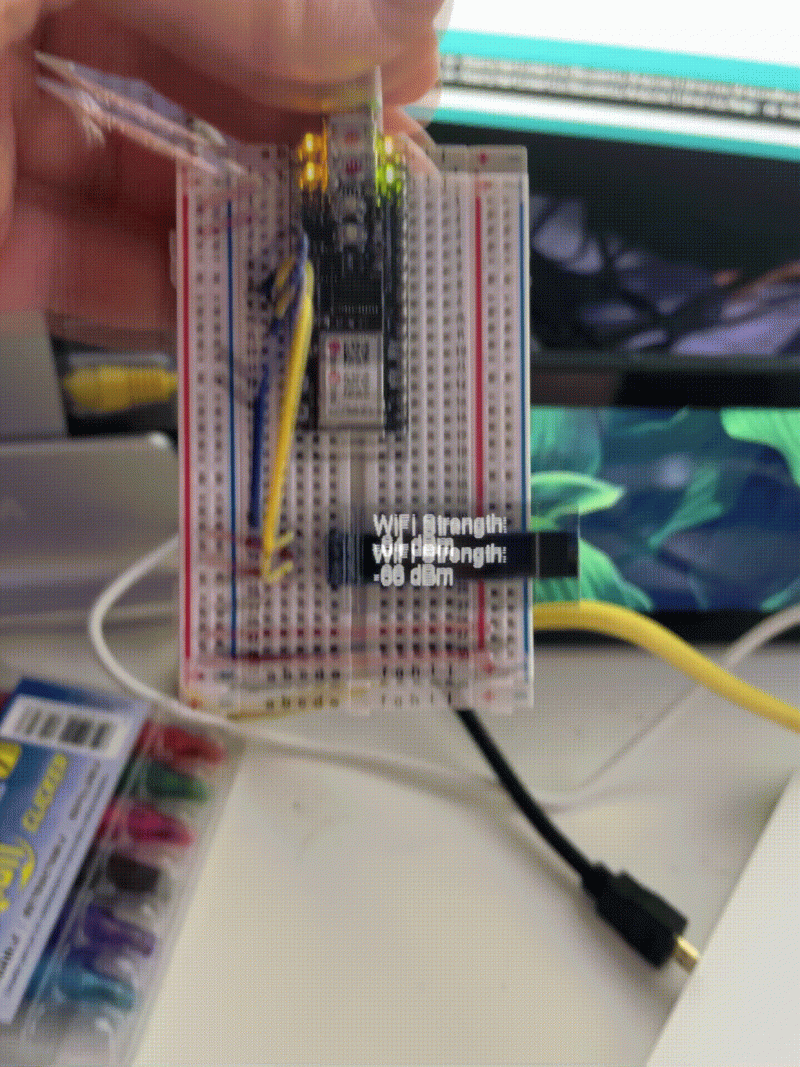
I got the breadboard to work with the screen by revisiting my code from week one; connecting the visitor information screen visible to the staff to the kiosk via p5 Serial Control. I had a hard time with the breadboard. I tried to get three buttons to light up three different lights. I trouble shot my code against the StateChangeButton example from the Arduino IDE, but couldn’t get multiple buttons with multiple lights to work—I could just be over-used/faulty component parts. I ended up rearranging my code to mirror the example, but was only able to get one light/one button to work; of course, I made that one button the designated physical help button. (In reality, having the physical button is a good idea in case servers—or other parts of tech—are down.)

In terms of what I didn’t get to work, my biggest obstacles were time being able to connect the form (to the spreadsheet) to the 4.2” e-paper screen. With the spreadsheet, here’s what’s going on: My code connected to the 4.2” screen reads from the same cells over and over again. I could probably fix that with (a lot) more time, but what it means is that using Google Forms to connect to the spreadsheet won’t work because I need the information in the cells to be overwritten instead of added to the new line below. (The advantage of the current code is that it checks to see if there are changes in the spreadsheet by checking it against what it recorded on the last check… and it only refreshes if there is different info.)
I searched for ways to connect my custom html pages to the form, but 1) there weren’t that many solutions, 2) the solutions added a new line—just like the form, and 3) I had to stop trying when I got locked out of scripts. *another sigh* Honestly, I assumed it would be WAY easier to connect my HTML forms to the Google Sheets. Part of the issue is that there are so many things to consider that I didn’t even think about the mechanics of Forms adding info to the next line of my Sheets document that it was actually my ‘fallback’ plan.
I also wanted to have the Arduino load different QR code image files depending on the time of day, but then realized that, if it’s doable, it’s not well documented. (That’s where the XBM file comes in… it was suggested as a way to be able to load images onto the Arduino, but I never got it to work. One of many rabbits I chased on this project.)
Knowing all I went through to get here, I feel happy with what I was able to accomplish for this project. More than anything it was a reminder of how complicated, convoluted, and overwhelming so many of these technology interactions can be. You can have all the parts of the system working together in their ‘segment’ but when you try to connect them you realize your approaches are incompatible; much like when you go to connect parts of a Brio transit and realize the two pieces you were planning to connect have protruding parts…. there is a solution, but you’ve got to sort through things a bit to find it.
Here is just one of those little successes that made it all worth it…
SCHEMATICS
As far as schematics go, I followed the tutorials for the e-paper screens linked. The breadboard with the push button and LED were very similar to the examples provided in the Arduino IDE, but here are a couple of views of the simple setup.

CODE
Regarding code, below are links to the different codes used in this project. I definitely relied on different sites, mostly blogs, to help me understand many of the concepts of how to make something like this work. I did not retype all of the code, but did go through all of it to make sure I understood it. I have to say that my plan was go to through and retype all of it, but I was really surprised by how much troubleshooting I had to do to adapt other projects to mine.
Here’s the link to the GitHub repo for my midterm project.
For the push button on the Kiosk, I reused code from my first assignment this semester to adapt the p5 Serial Control stuff. (Between the small space of the breadboard and the wires, I couldn’t tell if my computer was lagging—which is was at least somewhat—or I was bumping wires or if I did get the code to work to write back to the LED through the browser.)
For the email forms via PHP, I followed this tutorial.
For getting my paper screen working, I used the information provided by WaveShare for the Raspberry Pi, but this was mostly for the drivers. I followed this tutorial for connecting the 4.2″ WaveShare e-paper screen to Google Sheets! This tutorial helped me get up with the API needed for the project. Thanks, again!